This is a read only copy without any forum functionality of the old Modcraft forum.
If there is anything that you would like to have removed, message me on Discord via Kaev#5208.
Big thanks to Alastor for making this copy!

Show Posts

This section allows you to view all posts made by this member. Note that you can only see posts made in areas you currently have access to.


Topics - Mr. DK

Pages: [1] 2
1
Tutorials / Downloading a full patched 6.2.4 Client in any language
« on: October 08, 2017, 06:37:43 pm »
Hello, Modcraft

Today I want to write a small tutorial on how to download a full client with the help of your battlenet launcher.
This client is 100% done and will not try to download any additional Files.
It is ready to hop into Modding right away.

Step 1:
Goto https://bnet.marlam.in/ and register there. This site provides you with everything you need.

Step 2:
Goto http://myip.is/ and note down your IP.
Go back to https://bnet.marlam.in/ and hit Settings in the top right corner.
Enter your IP address in the Settings.

Step 3:
On https://bnet.marlam.in/overrides.php (top bar Overrides) adjust your settings as seen on screen below:

Make sure you scroll down to the bottom of the page and hit SAVE!

Step 3:
Close your Battle.net launcher if its running!
Goto the place where your Battle.net launcher has installed your Warcraft and rename the Folder.

Step 4:
Follow the instructions on the right side. They should probably look something like this:
Don't start your Battle.net Launcher YET!


Step 5:
Open your command console and type:
ipconfig /flushdns
Hit enter.

Step 6:
Start your Battle.net launcher and you will see that you can now install World of warcraft.
Normally install WoW as if you want to play on live server.
Don't mind the Launchers look it will download the correct version.
Wait until its 100% downloaded. (Don't hit play)
If you get any errors during this step simply restart your Battle.net launcher and download.

Step 7:
Enjoy your full WoD Client. (Make sure to copy it somewhere else so that the Launcher wont mess it up again)

FAQ:
Q: How do I get my Battle.net launcher to work normal again?
A: Revert Step 4

Q: How do I check if my versions correct?
A: Goto the place your Battle.net launcher is downloading to and right click your exe once it has shown up. Under the Details Tab it shows you the game Version.

Q: Can I use this method to download other versions aswell:
A: Yep.

Special Thanks goes to:
https://bnet.marlam.in/overrides.php - The Owner of this site who ever he may be!
Luzifix - Thanks for showing me how it works!

2
Getting started the WoD Tutorial / 05: First map
« on: March 09, 2017, 04:15:58 pm »

Hello everyone.

This time we are acually starting to mod something within the game. And what could be a better start than a own map.
Its fairly easy to get your own map into the game once you figured out how todo it.

Currently the way to go is creating a map in noggit on a 3.3.5 Client and then porting it up to WoD. Thats why I will explain how things are done in 3.3.5 and how they get ported.

What you will need
  • A 3.3.5 Client - Place into "WoDModding\Clients\"
  • Noggit - Place into "WoDModding\Tools\"
  • Adt Adder - Place into "WoDModding\Tools\"
  • Futa - Place into "WoDModding\Tools\"
  • Taliis - Place into "WoDModding\Tools\"
  • ADT - Converter - Place into "WoDModding\Tools\". Original Post
  • Warcraft Model Viewer - Make sure to get the 3.3.5 version and place into "WoDModding\Tools\"
  • MPQ Editor - Also downlaod ListFiles (last DL-Link) Place into "WoDModding\Tools\
  • WDT Supplies - Place into "WoDModding\Tools\"
I reccomend creating folders for every tool (unless they allready have).

Configurating Noggit
Browse to your noggit folder ("WoDModding\Tools\Noggit") and open noggit.conf. Adjust following paths:
Code: [Select]
#Path = D:\WoW 3.3.5\ to Path = C:\WoDModding\Clients\3.3.5\Ensure you remove the # in front of the path and set the correct path to your 3.3.5 client.

Then adjust following Line:
Code: [Select]
#ProjectPath = E:\project01\ to ProjectPath = C:\WoDModding\Projects\firstmap\We are going to create this folder in a minute. You can choose whatever name you wish to.

And last but not least:
Code: [Select]
#ImportFile = Path to Import file to ImportFile = C:\WoDModding\Tools\WoWModelViewer7\userSettings\log.txtNow that we have this done start your noggit to see if it loads up. If it does close it for now.

The benefits of projects
As you have seen above we created a project path. This is the path Noggit will load files from and will save files to.
Organizing your work in projects makes everything way more tidy than havign ti in your warcraft folder. I do use the project folder for a variety of diffrent things not only map work.
All future tutorials will use projects as much as possible.
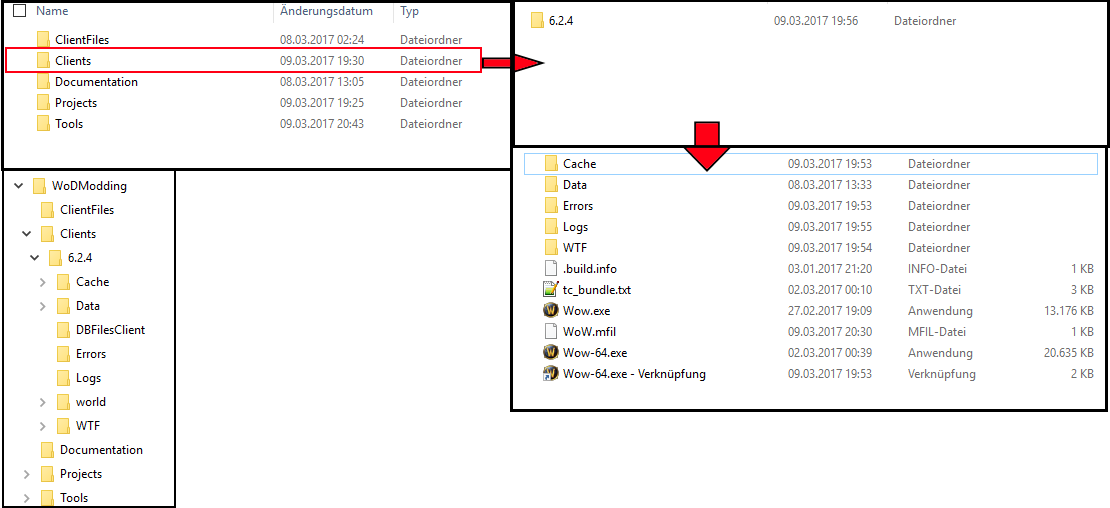
Creating your first project
Todo so browse to "C:\WoDModding\Projects\" and create a folder called "firstmap". After you have done this open the folder and create 2 new folders called "DBFilesClient" and a folder called "world".
After you are done open the world folder and create a folder called "maps". Open this and create a folder called "firstmap".
You should now have following 2 paths:
Code: [Select]
C:\WoDModding\Projects\firstmap\DBFilesClient\
C:\WoDModding\Projects\firstmap\world\maps\firstmap\
The first folder contains our modified DBC file and the second one contains your adts. An explanation of those can eb found in a previous tutorial.

Getting the 3.3.5 DBC
Since noggit needs a dbc to laod your map we have to provide one. This is where your MPQ editor comes into play. Startup the program and you will get a window like this:

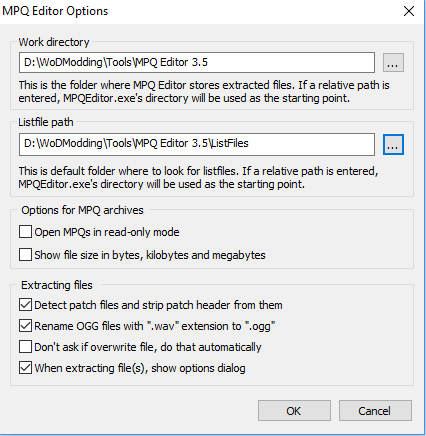
Set the paths correctly. If you dont have a folder ListFiles create it. Make sure you palce the Listfiles into the folder.
Then go to File->Open MPQ -> Browse to your 3.3.5 Client -> Data -> open enUS (or whatever locale you are using) -> open patch-enUS-3.mpq
It should now look something like this:

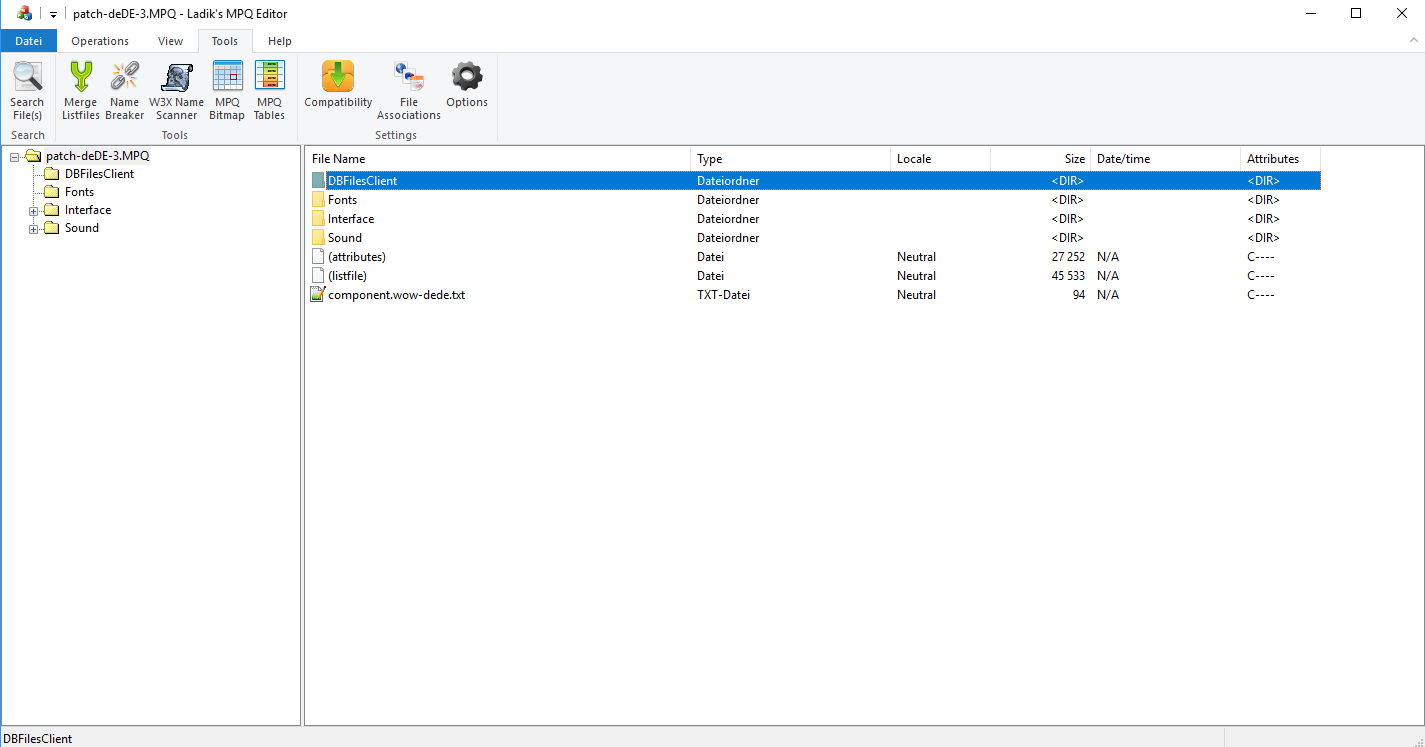
Go to DBFilesClient and right click map.dbc -> Extract -> OK. You cna now close MPQ-Editor.
In your MPQ-Editor folder should now be a "DBFilesClient" folder if you have set the paths correctly. Open it and copy the map.dbc to: "WoDModding\Projects\firstmap\DBFilesClient"
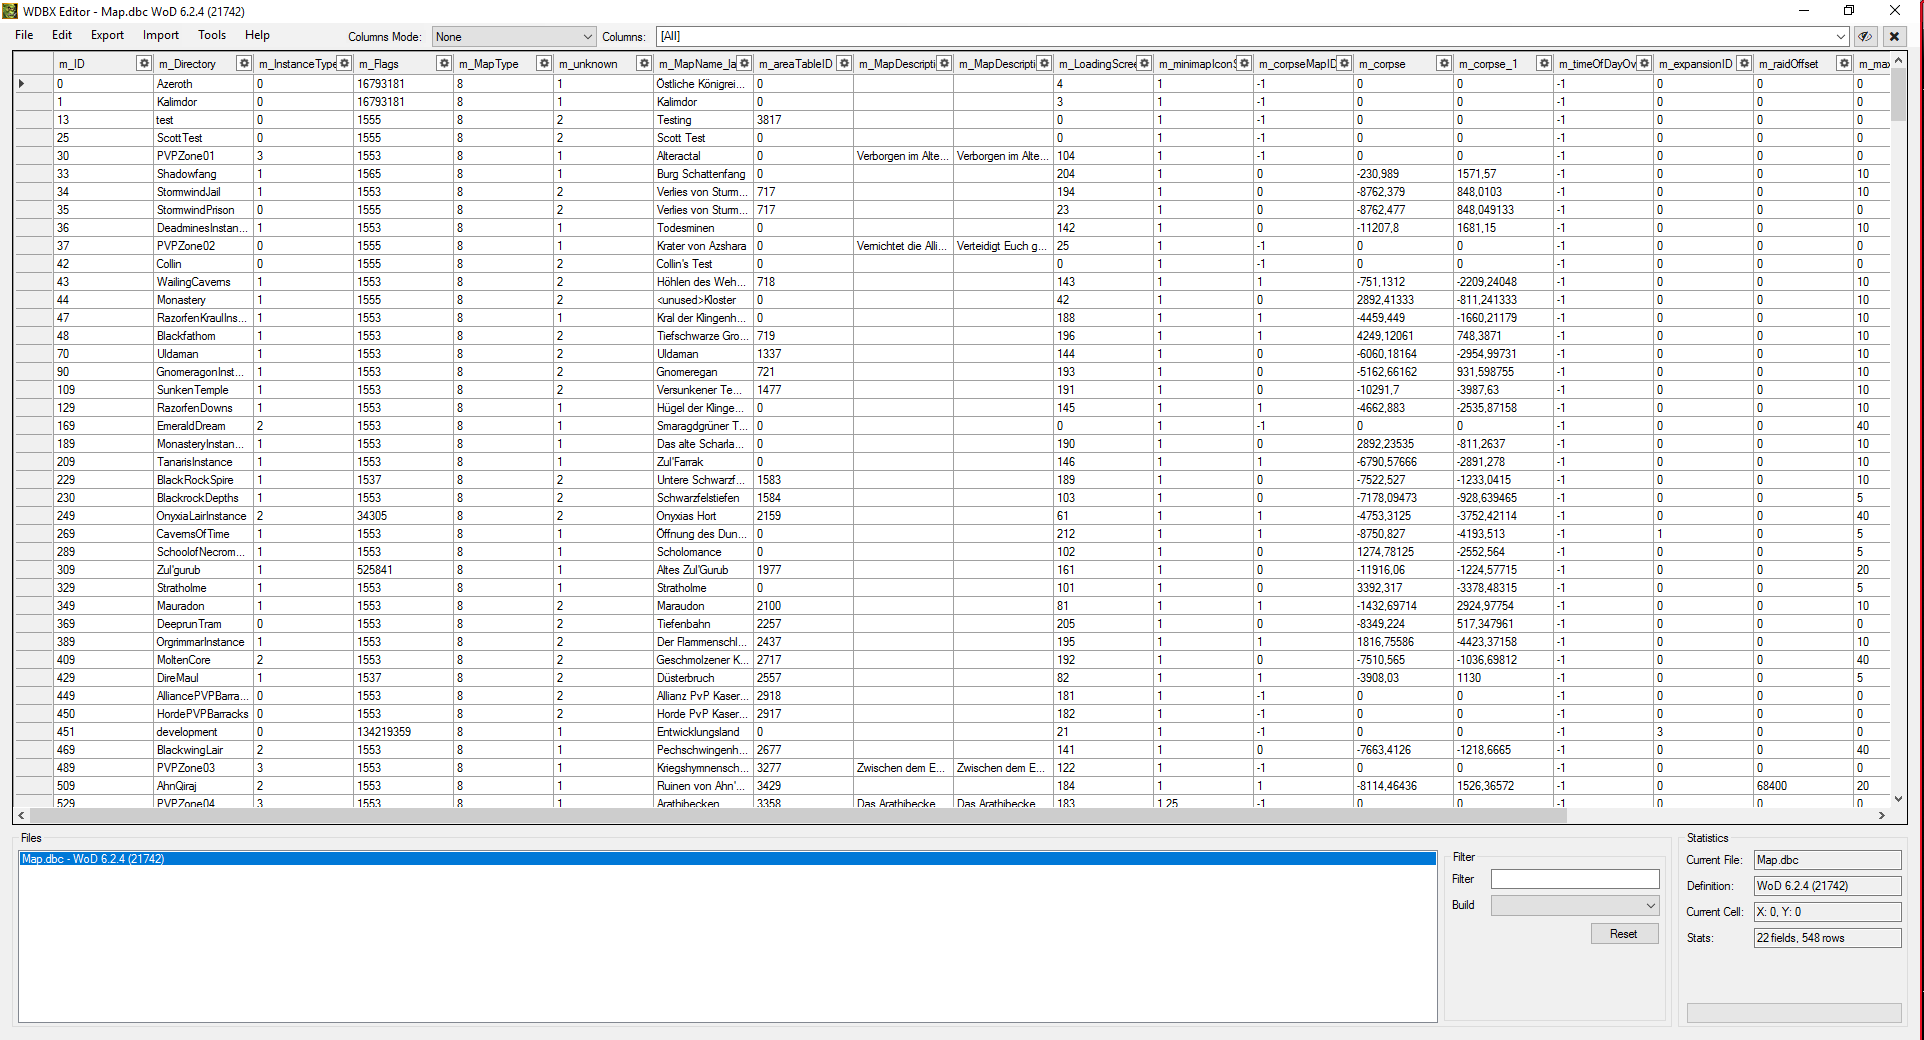
Changing the map.dbc
Now that we have the DBC we have to add a new entry for our new map. Open the map.dbc in your project with the WDBX editor and select WOTLK as version. It should now look something like this:
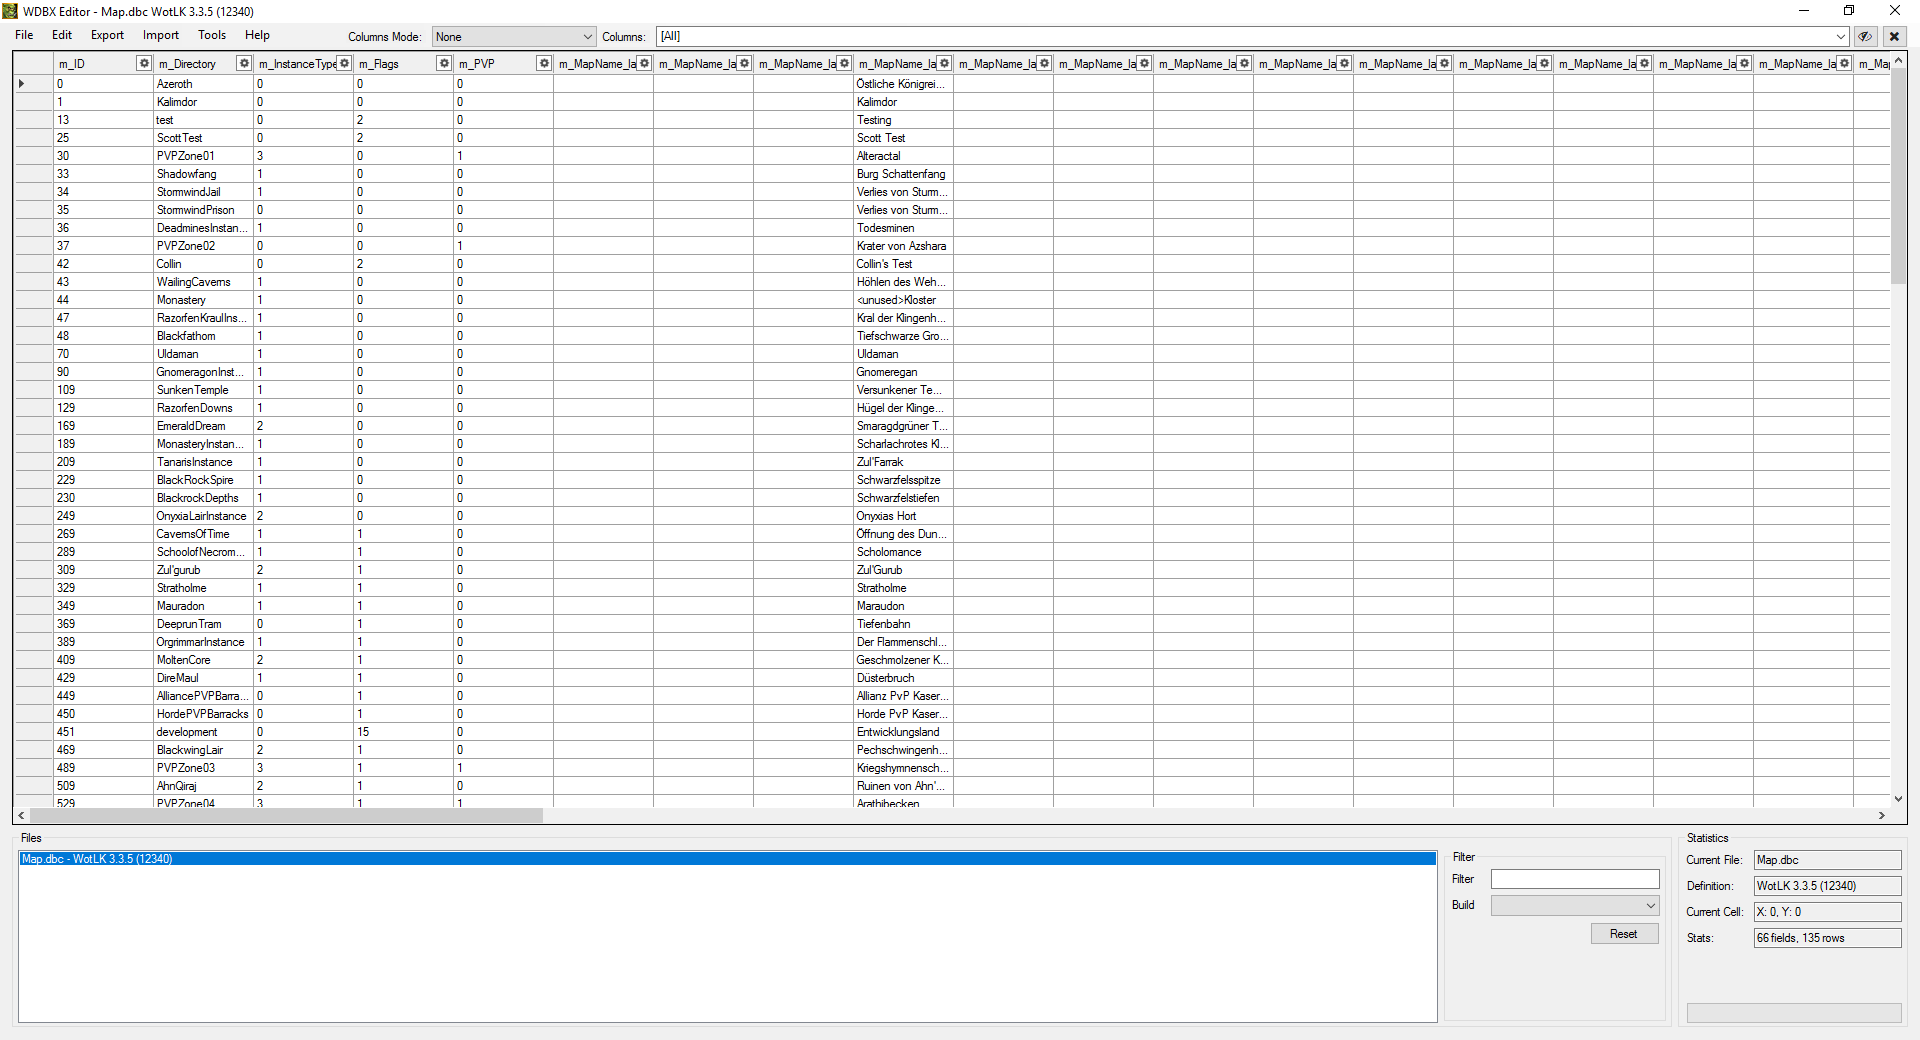

WoW map types
In warcraft maps have diffrent types. As you can see in the above db (3. colum). In 3.3.5 there are 4 types. 0 = Continent (Kalimdor), 1=  Instances, 2 Raids and 3 Battlegrounds. We want to create a regular map so our type will be 0.
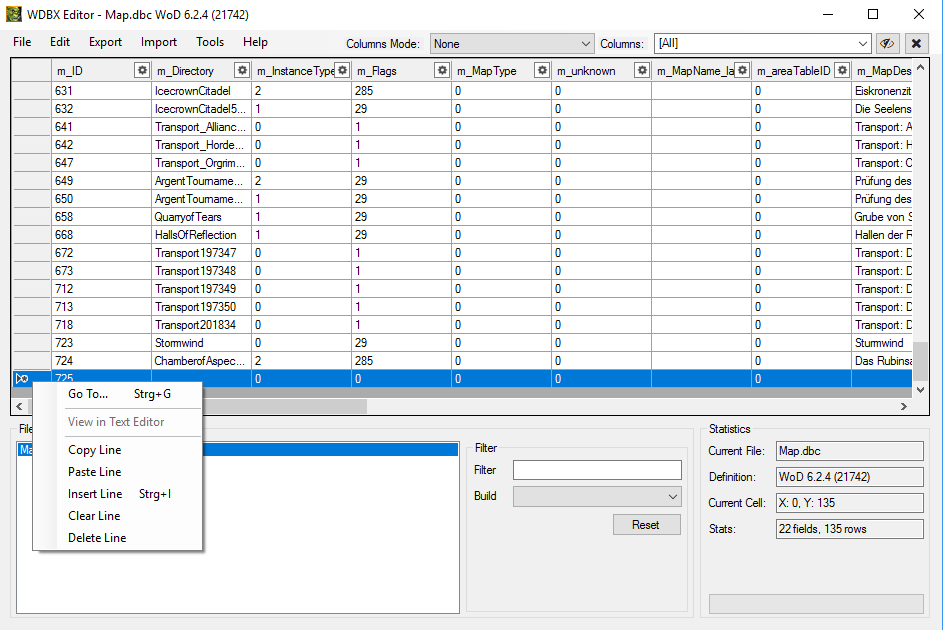
The easy way todo it
Since we want most value son default we can copy a exiting entry with type 0. For example Kalimdor. Todo so right click the space infront of the ID and select "Copy Line". Then scroll to the very bottom of the file and below the last entry right click the free space and select "Insert Line".

Now we ahve a new entry where we have to adjust some things. First of change directory to firstmap (this has tobe the exact name as was given in: "C:\WoDModding\Projects\firstmap\world\maps\firstmap\")
Then scroll right until you get to the name and change it to whatever you like. I will stick with Firstmap. Save the file and exit. It should now look like this:


Creating the ADTS
Next we need ADT files. Therefor we start with Taliis. Load up the program. One first load it asks you to select mpqs.
Simply skip and press ok. Then goto File->New->WDT. Name the wdt firstmap or exactly like your folder within your project. Now double click the WDT on the left. It now looks like this:
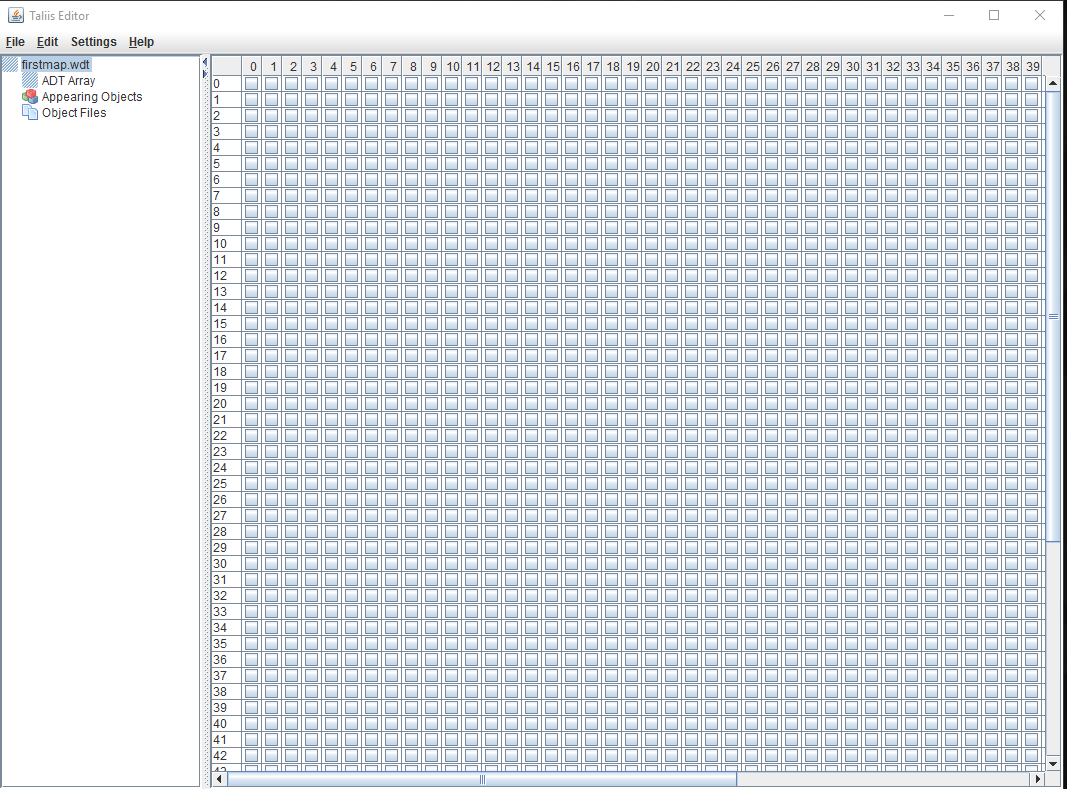

Whats a WDT
A WDT tells the client where a ADT is placed. Every square on the picture is one adt. So when you want to have a map that has 3x3 ADTs you have to tick the boxes.
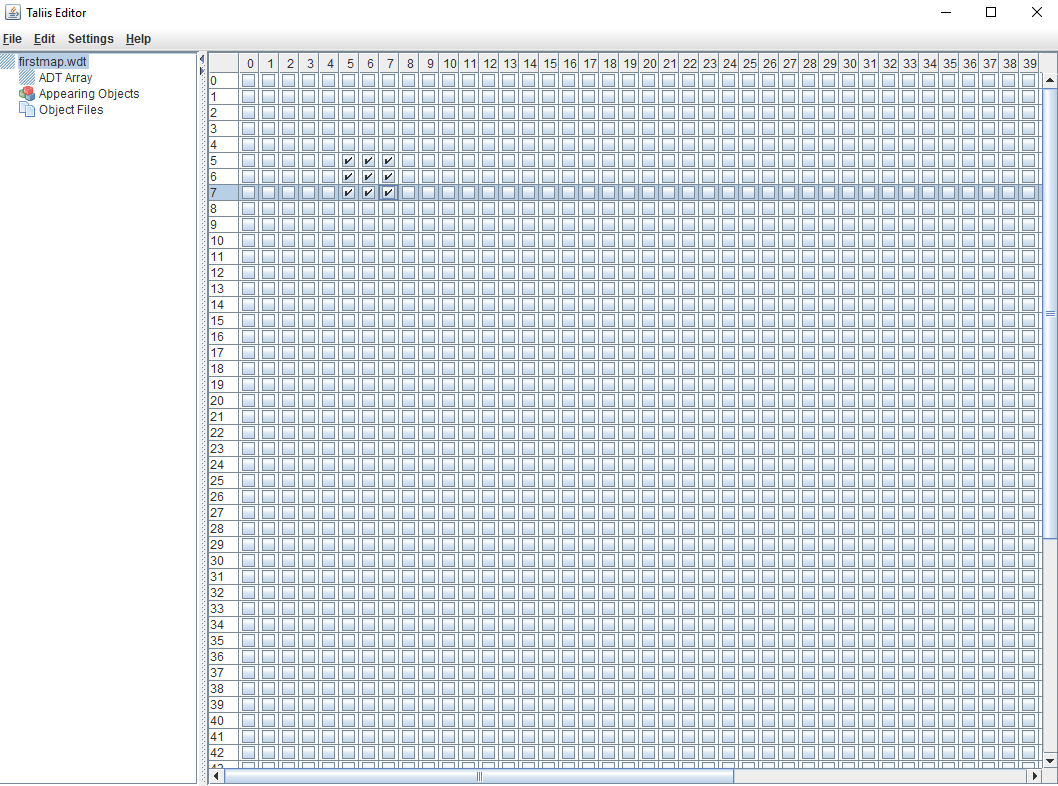
For this tutorial we will use a 3x3 which should be enought for now. Tick a 3x3 somehwere on the WDT make sure to remember the coordinates for the next steps.
Done correctly it should look liek this:

Now save the file to "C:\WoDModding\Projects\firstmap\world\maps\firstmap\" and close Taliis.

Using Futa to create a ADT
Now start Futa. Go to File -> New -> Adt Files
Fill in the following data.


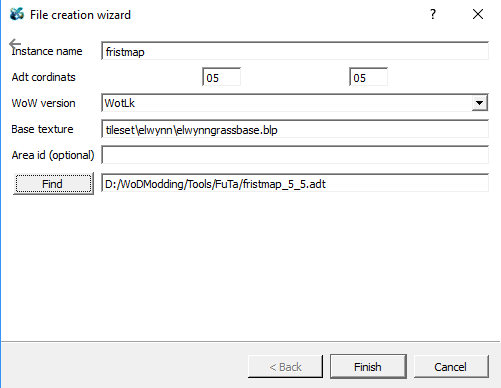
Now we have a fresh ADT created. It has a basic texture. You can use whatever Texture you like.
They can be found in C:\WoDModding\ClientFiles\tileset\. For this tutorial we will use: "tileset\elwynn\elwynngrassbase.blp"
Now safe the ADT to: "C:\WoDModding\Tools\ADTAdder\"

Using the ADT adder
Startup the Adder and fill it like this. Select the ADT we just created and then fill in the top left coordinates of your WDT grid aswell as the bottom right. Like this:

Start creation and wait for the programm to finish.
It should then look like this:

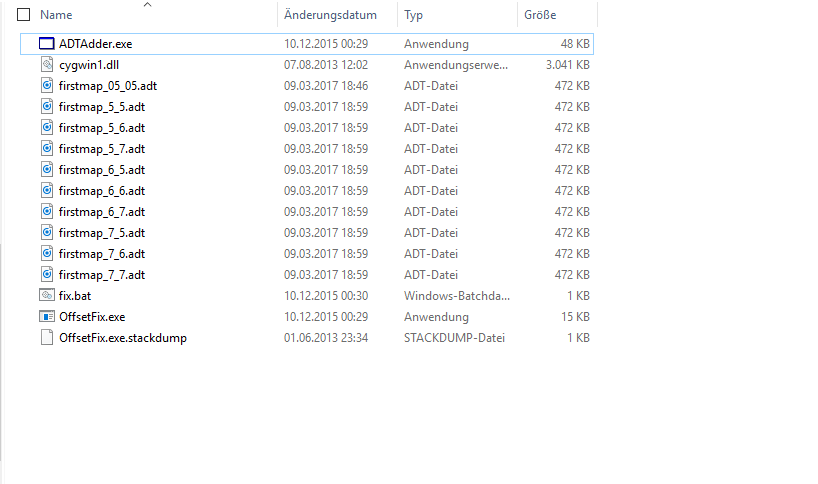
Now execute fix.bat this is needed becasue of the way the adder was designed. Whenever you change a ADT's coordinates make sure to fix it after.

Using the ADT in noggit
Copy the new adts (without the old) to "C:\WoDModding\Projects\firstmap\world\maps\firstmap\". Now start Noggit and you will be able to select your new map:

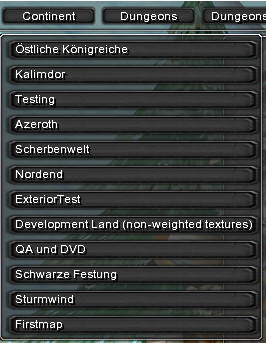
Select it and you will see following screen:

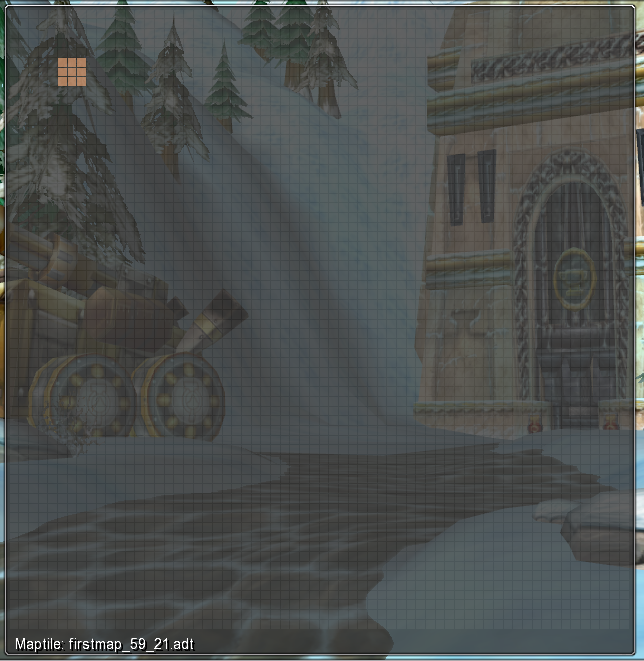
Cou can clearly se the 3x3 square we jsut created. Click on a highlighted ADT to open Noggit. This tutorial will not feature how to use noggit.
You can find plenty tutorials on that on this forum.

Getting your maps to work in WoD
Thanks to Luzifix we have a simple converter that allows us to very easy port our maps up to WoD.
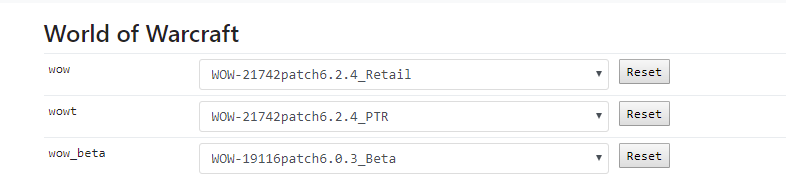
But first we need to do some DBC work. Goto your Server folder and open the dbc folder. Open the map.dbc with WDBX and this time select WoD 6.2.4.
As you can see it looks a bit diffrent to the 3.3.5 one but dont worry. Again copy the Kalimdor line and paste it into the last row.
This time remember the ID. Adjust directory and name to firstmap. Then safe the file and close WDBX.

Now open MapDifficulty.dbc and create a entry in the alst row. In the second colum fill in your map ID. rest should be 0.

Now copy the map.dbc and the MapDifficulty.dbc  to "C:\WoDModding\Clients\6.2.4\DBFilesClient\" (create this folder). Alwas make sure DBC/DB2 in your Client and server are the same.
Also create following folderstructure: "C:\WoDModding\Clients\6.2.4\world\maps\firstmap\"

Adjusting the WDT
Now we need WDT supplies. Simply copy your WDT from your projects folder to your WDT Supplies folder and execute Launch.bat.
Copy the five files incduing the WDT to: "C:\WoDModding\Clients\6.2.4\world\maps\firstmap\"

The acual conversion
Now go to your ADT converter folder and open watcher.cmd with notepad.
Fix the paths to mach your paths:
Code: [Select]
ADTConvert.exe "C:\WoDModding\Projects\firstmap\world\maps\firstmap" --output="C:\WoDModding\Clients\6.2.4" --watchClose the file and run it. Now the converter will watch your project folder. And everytime something in there changes (like you saving in noggit) it will automaticly convert all files and put it into your WoD folder.
Here is a video that shows how this works: LINK
Make sure to at least edit all your ADTS once so they get converted.

You can also manually convert all ADTS: LINK

Going live
In order to visit your map you have to know the ID from the map.dbc and coordinates. These can be found in Noggit:

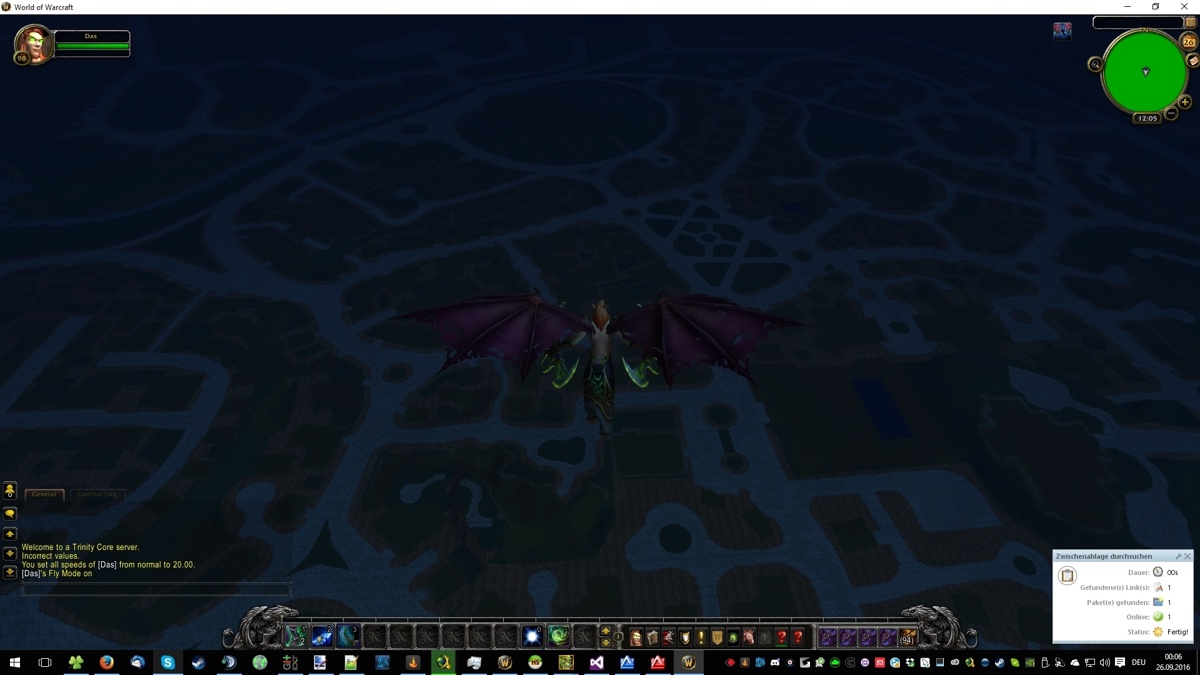
Note down the Server coordinates an launch your WoW. Loginto the game and type following command:
Code: [Select]
Command: .go xyz id
Example: .go 13620 13818 70 1498
Now you should be teleported to your map:


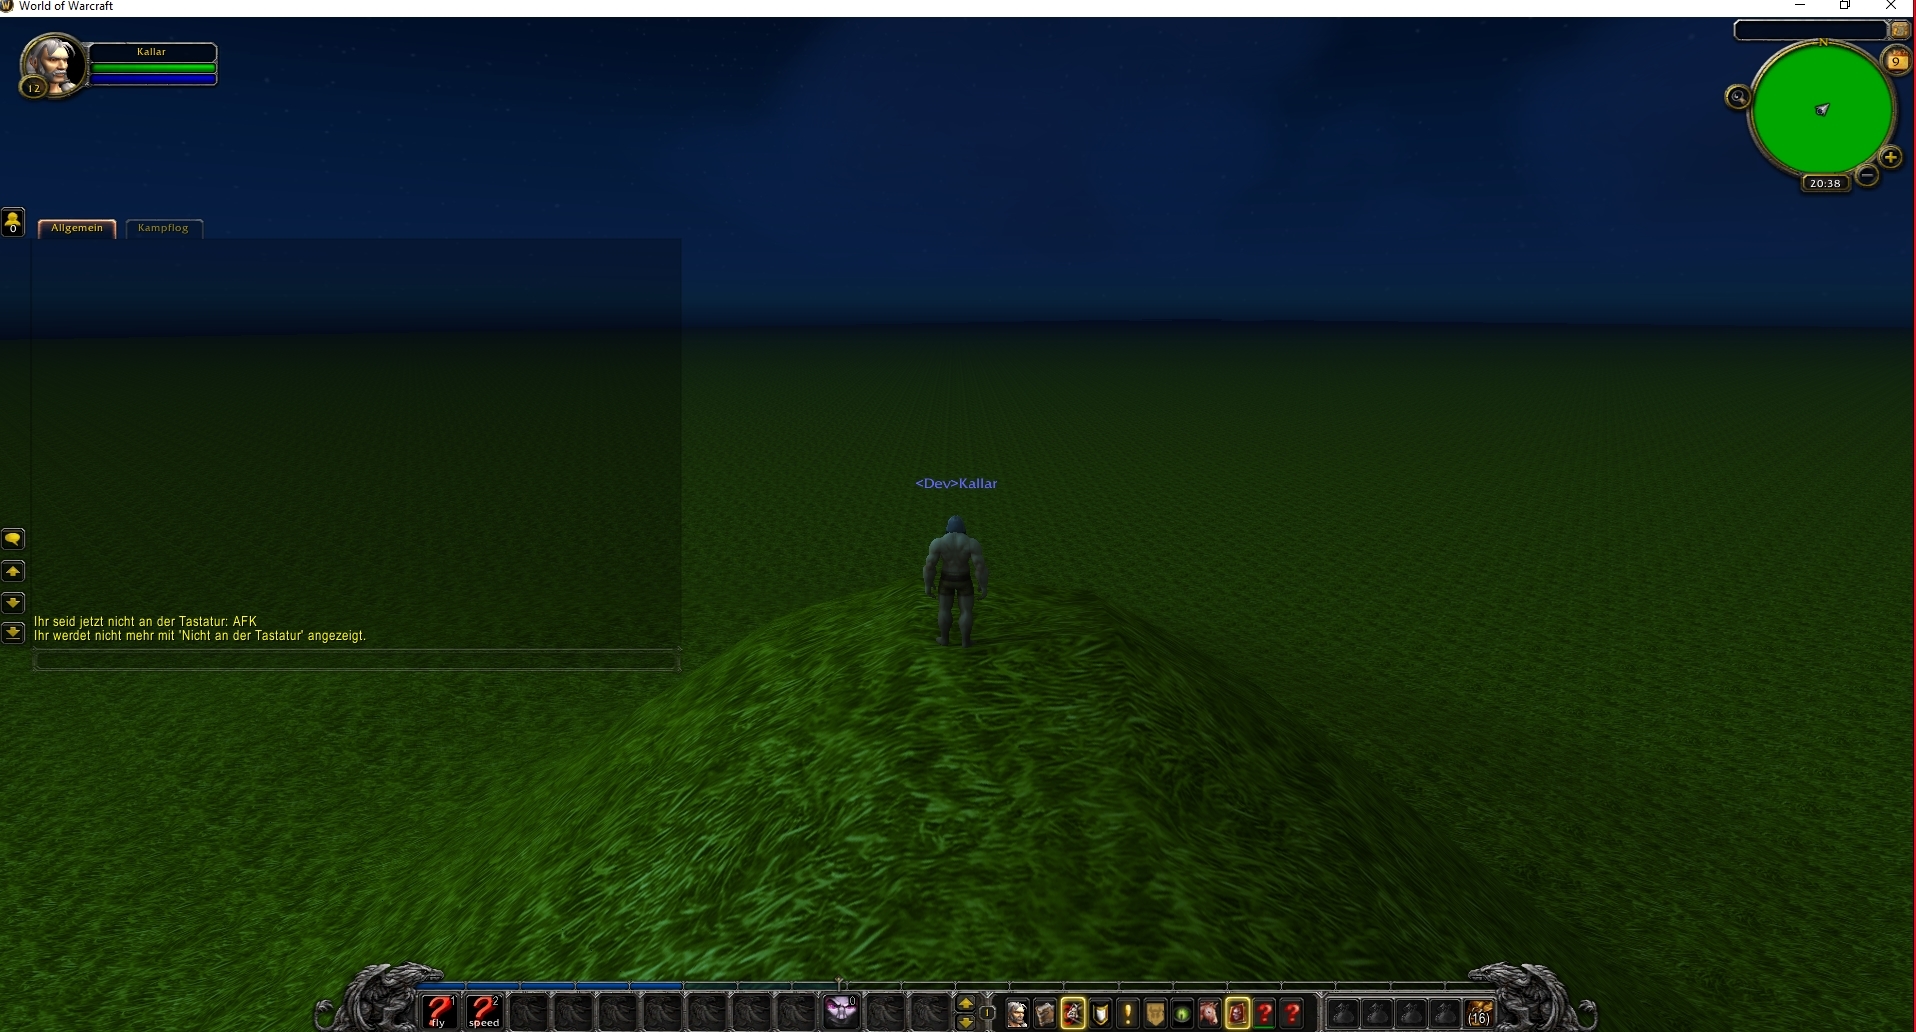
Thanks for bearing with me. I hope to see alot of WoD world builds in near future! As always if you have questions let me know.


3
Getting started the WoD Tutorial / 04: The Client Files
« on: March 08, 2017, 05:13:39 pm »


Hello everyone,
this tutorial explains the relevent contents of your WoW Client. Inside the CASC everything is organized in a folder structure.
It is key to maintain this structure of the client will not load your data. So I will explain what belongs in the folders.

General folder overview
  • cameras - Contains flying camers for cinematics
  • character - Contains all textures and m2 for player models, aswell as some extra races
  • creature - Contains all other creatues that are not inside the character folder
  • dbfilesclient - Contains all dbc's and db2's
  • dungeons - Contains textures for Wmo's
  • interface - Contains lua files that define the ingame interface. Aswell as icons and other visual stuff for the interface
  • item - Contains item m2's aswell as textures for items
  • particles - Contains particle effects
  • sound - Contains sound files
  • spells - Contains spellrelated textures and m2's
  • textures - Contain misc textures like guildemblems
  • tileset - Contains ground textures
  • world - Contains objects, Wmo's, maps
Some folders have been left out since they are not really important for modding.
If you are interested you can have a look for yourself.

Important file types
  • BLP - Blizzard Picture is Blizzards own image format. You find texture, maps and interface elements with this type.
  • DBC/DB2 - DataBase Client files store the data for the client. You can think about them like excel files. You have rows and columns of data describing many things. For example what maps you have or the races, spells and much more.
  • LUA - Are script files in the language Lua that defines the actions for the interface. Like what happens if you click the login button.
  • XML - These files define the look of the interface. It places images, models and UI elements.
  • M2 - Models like creatures, trees and other small stuff.
  • SKIN - Texture information for M2s
  • WMO - World Models are bigger models like houses, bridges or full cities and dungeons like stormwind or Deathmine.
  • ADT - A Maptile of a map like Azeroth. Every map can have 64 x 64 tiles in full size.
  • WDT - A map definition file. It defines if and what ADTs on the map exist or if the map is built only out of one WMO like instances.
  • WDL - A lowres heighmap of all ADTs of the map. This file is used to display far away mountains.

Replacing Client Files
The simplest way tp  mod the client is replacing exiting files. A example would be changing the Color of a Item.
Todo so create a folder called item within your WoD Client. Locate the texture you want to replace and copy it with its folder structure. Edit the blp as you like and place it in your folder. You modified WoW will load this file and repalce the original one.

Though its very easy its not recommended to replace original files. A better way of creating items can be found in the tutorial explaining Item creation.

WDBX and DBC/DB2
In WoD there is a new db format called DB2. Both files can be opened with the WDBX editor. There are different editors out there but I reccomend using WDBX.
When opening up a file with WDBX you will be asked wich version to use. Pick WoD 6.2.4.
It should then look something like this:

Dont be afraid. I will explain alot of that in more depth once we need it.


4
Getting started the WoD Tutorial / 03: Server setup
« on: March 08, 2017, 01:30:23 pm »


Hello and welcome back. Today we will tackle a topic that is an obstacle for most modders. Setting up a Server.
To make things easy I created a package containing my WoD Server. It differs in small parts from the original WoD trinity core which should not affect you.
Though I recommend you compile yourself your own Server. You can find a link and some notes on that further down this post.

So let's start with things you will need:
Heidisql should not be a problem to install. Once you have finished installing goto your WoDModding Folder and open: "WoDModding\Projects\". Inside there extract my Server.

Installing Mysql
During MySQL Configuration, near the end of the installation process, create the user trinity with password trinity to match the trinity:trinity settings in the default server .conf files.
Make sure that this user is set to have the DB Admin role and with Host type localhost instead of the default <All Hosts (%)> because of the low security of the well known password "trinity".
You can also choose your own user and password to increase security but it's only really needed if you want the server to be public at some point.

Install OpenSSL
Just install from Link above.

Populating the database
Once you have finished installing mysql open your heidisql and create a new connection with the username and password from above.
Inside this Server you can find a folder called SQL. Open it and you will find an Sql file. In order for the Server to work you have to execute this file.
In later tutorials I will explain the database as we use it.

Server files
If you changed your username and password from trinity to something else you have to adjust the config files.
Open both with a text editor and adjust following lines:
Code: (worldserver.conf) [Select]
LoginDatabaseInfo     = "127.0.0.1;3306;trinity;trinity;auth6"
WorldDatabaseInfo     = "127.0.0.1;3306;trinity;trinity;world6"
CharacterDatabaseInfo = "127.0.0.1;3306;trinity;trinity;characters6"
HotfixDatabaseInfo    = "127.0.0.1;3306;trinity;trinity;hotfixes6"
The first trinity is the username the second is the password.

Also you have to change following line:
Code: (worldserver.conf) [Select]
Updates.EnableDatabases = 15 to Updates.EnableDatabases = 0
Code: (bnetserver.conf) [Select]
LoginDatabaseInfo = "127.0.0.1;3306;trinity;trinity;auth6"Repeat this for the other file.

Extracting the needed files
You have to extract some files from your client to make the server run. To do this copy the contents of the extraction folder within your server to your client folder.
There, simply execute extractor.bat and choose option 1. Wait for the extractor to finish and then copy the folder dbc and maps to your server folder.

Starting your server
Once you're done with the steps above you should be able to start both server executables.
Wait for them to load up and then go to your worldserver.exe.
Type in following 2 commands:
Code: [Select]
Command: bnetaccount create <user> <pass>
Example: bnetaccount create test@test test
Code: [Select]
Command: account set gmlevel <user#realm> 3 -1
Example: account set gmlevel 1#1 3 -1

The first command creates a new account. Make sure you have a username that contains a @. Make it look like an e-mail or it won't work.
The second command enables your gm status so you can use in game gm commands.
Once all this is done restart your server and try logging in. Make sure to use my executables in your WoD client. You should be able to log in game now.

Connecting your Client
In order to connect to your server you have to go to "C:\WoDModding\Clients\6.2.4\wtf\config.wtf". Open it and change following line:
Code: [Select]
SET portal "127.0.0.1"If you don't have this folder or file start your client once and close it again.

Doing it the right way
This tutorial simplifies a lot of the steps for you, but some mods require you to make serverside changes. This tutorial is meant for those who have trouble compiling code. That's why I highly recommend that you compile your own Server using the Trinity Core tutorial if you are capable of doing so. Make sure to get the right commit from the master branch or you will end up with a Legion server.


5
DBC / DB2 / DB modding / Important information before posting!
« on: March 08, 2017, 01:14:38 pm »
Hello Modcraft,

Please note that this board section is dedicated to Warlords of Draenor.
Before you post any topics make sure your topic is related to Warlords of Draenor.
If your post is not realted to it it will be moved.

6
Getting started the WoD Tutorial / 02: Basic setup
« on: March 08, 2017, 02:17:37 am »


Hello and welcome again to our second part of the tutorial series. This time we will focus on setting up your work environment.
I prepared a small folder structure to make things a bit more easy:

WoD Folder Structure

Copying your files
Download and copy to somewhere on your computer. For example C:\
From here take the following simple steps:

  • Copy the content of your WoW client to: "WoDModding\Clients\6.2.4\"
  • Copy your tools to: "WoDModding\Tools\"


Extracting the Files
Now we will extract the client files. Note that this will only work if your client is a full download.
In order to achieve this open your CASC Explorer in the tools section.
Go to File and choose Open Storage...
Browse to your client folder and select it. The explorer will automatically open the CASC storage and display all files.
Select all the folders within the display and right click extract. Now select the following folder: "WoDModding\ClientFiles\".
Wait for the process to finish. You can continue reading while the program is running.

About CASC and the explorer
One benefit of the new CASC system is that it's unlikely to break your client. Unlike MPQ where you can modify the base data of the game.
In WoD modding the explorer is used to extract the base files so we can use it. Whenever you break one of your extracted files you can simply reextract.

Other tools
I will feature other tools as we use them in further steps of the tutorial. But feel free to take a look at the tools section where you can find a lot of different tools to use.

That's it for this part, the next tutorial is about how to setup the a WoD Server.


7
Getting started the WoD Tutorial / 01: Basic WoD modding information
« on: March 08, 2017, 12:29:58 am »

Hello everyone and welcome to the first part of this tutorial series. In this tutorial I'll explain how you can modify Warlords of Draenor.
First off, here is a list of things that you'll in order to get started:
  • A full WoD 6.2.4 - Base of every modding setup
  • Casc Explorer - To extract content from your WoW Client
  • WDBX Editor - Used to modify DBC and DB2 Files
  • Patched WoW Executables - Info can be found here
This list will be expanded as the tutorial progresses.

About the WoD client
As opposed to WOTLK,WoD uses the so called CASC format. This has some benefits and some downsides. Currently there is no way for us to modify CASC directly, but don't worry, there's a diffrent way. The executable from the list above allows you to simply place your files in your Client folder. Your client will load all files from there.

About resources and Tools
Currently some things can only be achievedby modding a 3.3.5 Client and converting content up to 6.2.4. I have faith tin that we'll have proper tools in the future. Until then I'll explain it this way and update tutorials once there's a better way.

Questions
If you have questions regarding WoD modding. Feel free to create a topic in the proper section or PM me. I'll answer once I have time.


8
Getting started the WoD Tutorial / 00: Table of contents
« on: March 08, 2017, 12:15:18 am »
Below you can find a list of each individual part of this tutorial series.


01: Basic WoD modding information
02: Basic setup
03: Server setup
04: The Client Files
05: First map

9
Miscellaneous / Important information before posting!
« on: March 07, 2017, 11:55:08 pm »
Hello Modcraft,

Please note that this board section is dedicated to Warlords of Draenor.
Before you post any topics make sure your topic is related to Warlords of Draenor.
If your post is not realted to it it will be moved.

10
Tutorials / Important information before posting!
« on: March 07, 2017, 11:54:42 pm »
Hello Modcraft,

Please note that this board section is dedicated to Warlords of Draenor.
Before you post any topics make sure your topic is related to Warlords of Draenor.
If your post is not realted to it it will be moved.

11
Serverside Modding / Important information before posting!
« on: March 07, 2017, 11:53:19 pm »
Hello Modcraft,

Please note that this board section is dedicated to Warlords of Draenor.
Before you post any topics make sure your topic is related to Warlords of Draenor.
If your post is not realted to it it will be moved.

12
Tools / Important information before posting!
« on: March 07, 2017, 11:47:42 pm »
Hello Modcraft,

Please note that this board section is dedicated to Warlords of Draenor.
Before you post any topics make sure your topic is related to Warlords of Draenor.
If your post is not realted to it it will be moved.

13
Tools / [RELEASE] WoD 6.2.4 (21742) Removed GlueXML Check
« on: March 02, 2017, 04:31:01 pm »
Hello Modcraft,

I managed to break the XML protection on the last WoD version. This allows in depth editing of the Interface.

Edits:
1. Loading Files directly from you game folder (because we currently can't edit CASC) - Original files with this edit can be found on ownedcore
2. Patched to allow you connect to a private server (simply put in the Ip in WTF/Config) - Done with connection patcher from trinity core
3. Removed GlueXML protection from the Exe - Done by me

How to Use:
Simply place the exe in your game folder and your good to go

Additional Info
1. This exe has no CDNS setup. So I recommend only using this on a full downloaded Client.
2. Only use for modding purposes not to play on other servers (They may have own edits)
3. If you encounter a error saying you lack some sort of startup strings. Add this to your WTF/Config.wtf: SET agentUID "wow_deDE" (instead of deDE use the locale of your client like enUS)

Download
6.2.4 Exe no GlueXML check

Edits in 010
So in case you want todo it by yourself here are the byte edits:

x86:
Code: [Select]
02 00 00 00 84 5D 14 74
Edit to:
02 00 00 00 84 5D 14 70
Code: [Select]
29 FF D1 FF 59 84 C0 74
Edit to:
29 FF D1 FF 59 84 C0 75
Code: [Select]
E8 50 49 CE FF 50 E8 BD 24 C5 FF 83 7E 28 00 0F 95 C0 0F B6 C0 50
Edit to:
E8 50 49 CE FF 50 E8 BD 24 C5 FF 6A 00 90 90 90 90 90 90 90 90 90
Code: [Select]
B1 D1 C2 FF 68 7B 51 05 01 6A 03
Edit to:
B1 D1 C2 FF 68 7B 51 05 01 6A 02
Code: [Select]
BE 7B 51 05 01 56 6A 03
Edit to:
BE 7B 51 05 01 56 6A 02
Code: [Select]
FB 00 8B 5D 08 68 75 51 05 01 6A 01
Edit to:
FB 00 8B 5D 08 68 75 51 05 01 6A 00

x64
Code: [Select]
02 00 00 00 40 F6 C5 01 0F 84
Edit to:
02 00 00 00 40 F6 C5 01 0F 80
Code: [Select]
74 3D 4C 8D 05 7E 53 8E
Edit to:
75 3D 4C 8D 05 7E 53 8E

14
"Retro-Porting" / [QUESTION] [Legion] Porting maps to Legion
« on: September 26, 2016, 02:05:49 pm »
Hello,

I recently tried porting maps to Legion. Basicly what i did was convert them to WoD did the db2 entries and looked how things behave.

This is the Result:


The map should be full of objects. It also contains invisable walls.
Does anyone have a Idea what could be the issue.
I heared that they chanched somethign in the way objects are saved. Could anyone point me to a source where I can read about that chanche or even better know a direct Solution.

15
Resources and Tools / [Looking For] WoD Client 6.2.4
« on: September 25, 2016, 02:42:49 am »
Hello everyone,

I am looking for a clean WoW 6.2.4.21742 or better said the Last WoD client if anyone can provide that would be great!

Pages: [1] 2