Well hi everyone, I'm just going to start out by saying, this is just my way of doing this.
I hope it serves as a guidline for your progress in making WMO's correctly.
Thesis: This is a step-by-step tutorial on how to
A.) Convert OBJ's to WMO's using the provided resources and 3DS Max 2013 / Blender.
B.) Write the DBC entry.
D.) Apply the Patch.
ALSO I'm assuming you've already went ahead and done this guide fullly :
http://modcraft.io/viewforum.php?f=78Step 1: Things you'll need(If you have a different version of MPQ edit, that should suffice.)
3ds/OBJ to WMOBLP LabMyDbcEditorMPQEdit3.2Tree&Sword Tut OBJSo.. after gathering all the resources above and having your OBJ ready to go..
Step 2: We're going to open up 3D's max, or even Blender if you want, but I'll be showing max.
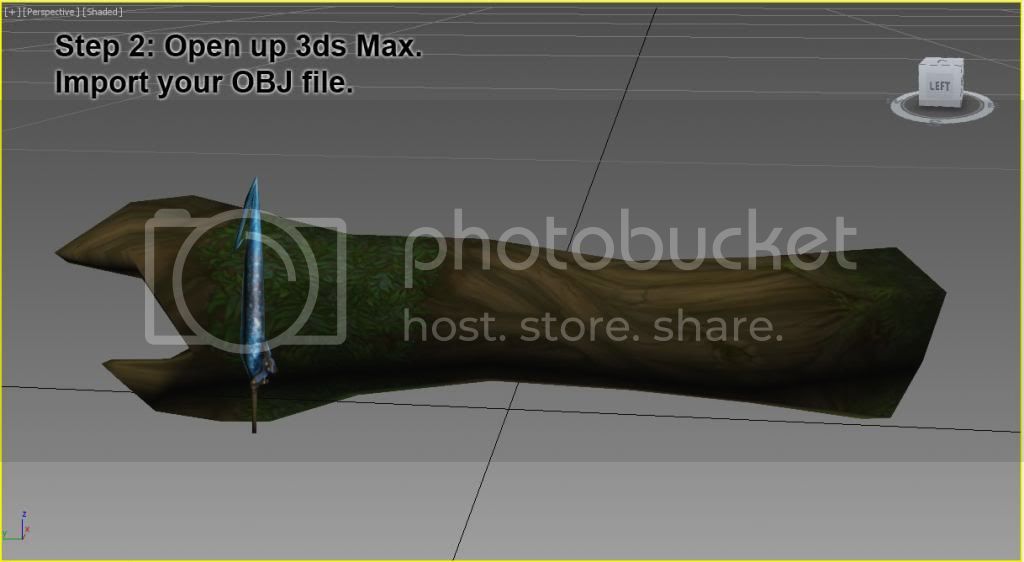
The image speaks for itself.
Step 3: 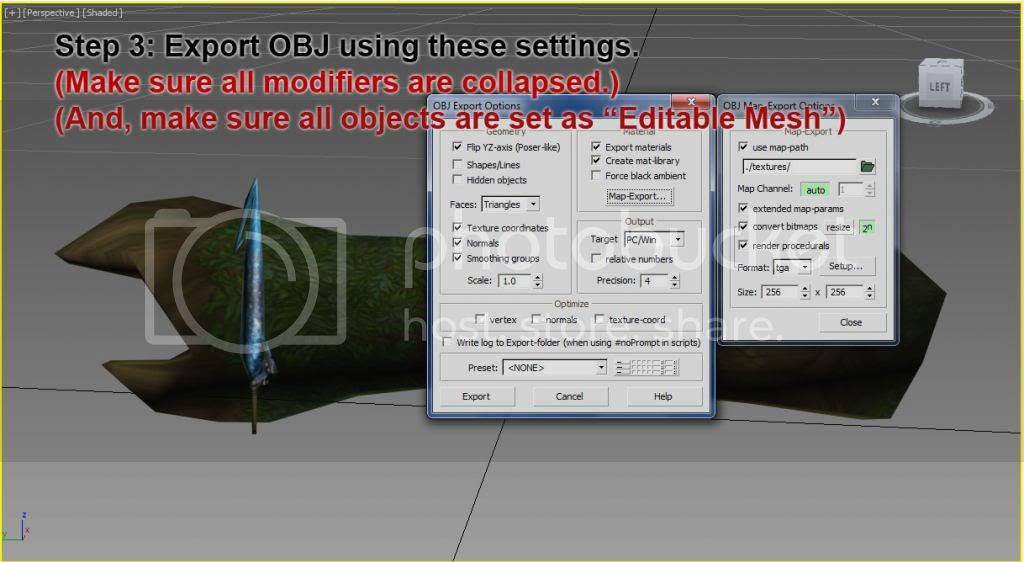
These settings seemed to have never failed for me.
The panel on the right hand side, can be done differently, this is just to export your textures as whatever file type you might like, and place that right beside where the OBJ will be exported in the ./textures/ folder, you can change the name to whatever you want, but be sure you remember the path layout, you'll be needing it later.
More Info:
http://egamh9.net/dev/mm/index.phpStep 4: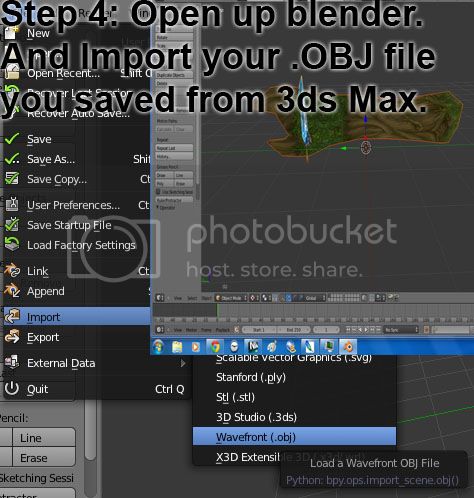
So after exporting froms 3ds max, we'll be opening that same OBJ file, with Blender.
Just select from the drop-down up top.. File > Import > Wavefront (.OBJ)
After it's imported and in your view, make sure the object is the correct way, otherwise when you try to place it in Noggit, the model will be rotated the wrong way and just a mess of problems.
Step 5: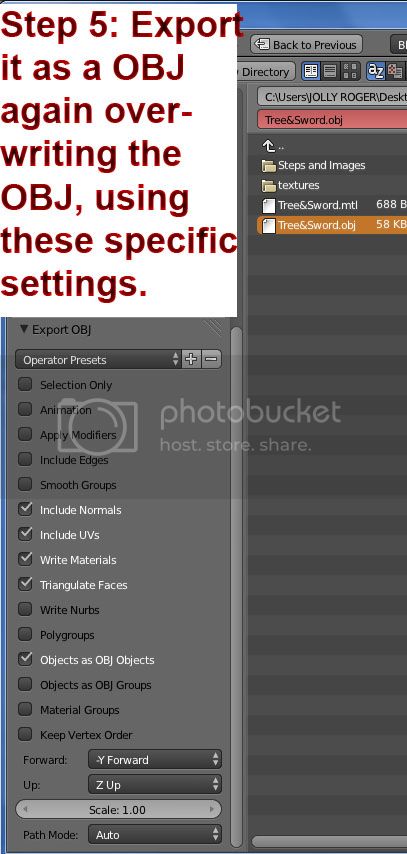
After importing and having the model the right way.
We'll be exporting the model, using these exact settings.
This is not Burker King. You can't have it your way.
Then exit Blender.
Step 6: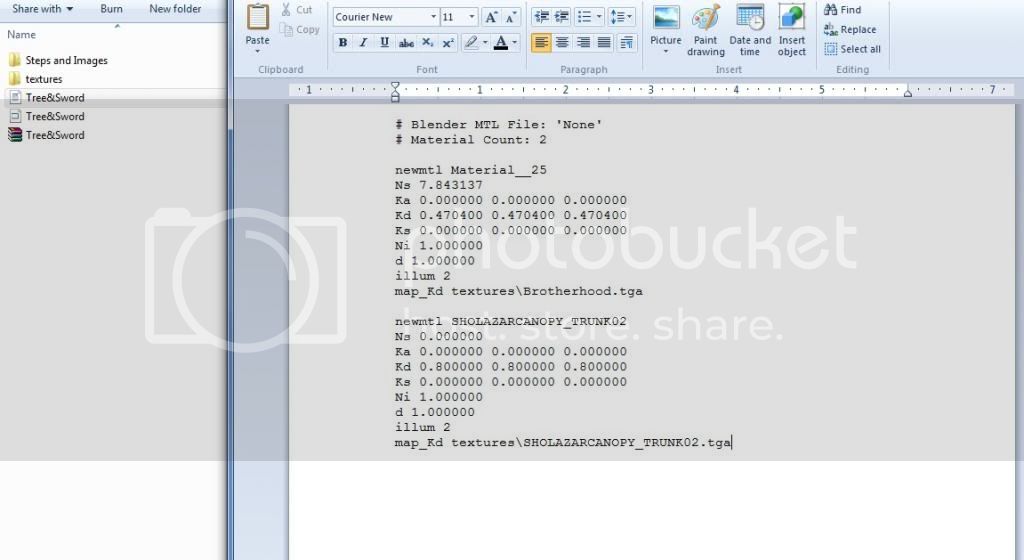
Now, locate the OBJ file that you just finished exporting again from Blender.
There will be a .MTL file next to the .OBJ file, this file tell which materials use which textures.
When you open the file, there will be triplicates of the texture names.. such as..
map_Kd texturesBrotherhood.tga
map_Ka texturesBrotherhood.tga
map_d texturesBrotherhood.tga
We only use map_Kd in our file, so you can delete the extra 2 lines.
Do this for every material in the file and save the text and close out.
Step 7: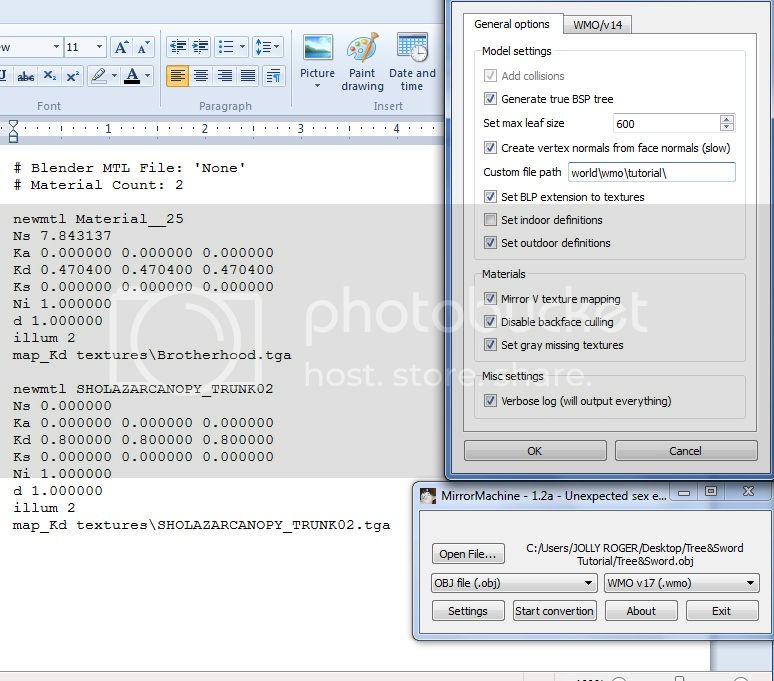
Now, you'll be opening 3ds/OBJ to WMO (MirrorMachineQT).
Select the Settings, and set them as so for this model.
Detail on why these settings are the way they are can be found :
here.One VERY important thing though, always make sure, your file path is set correctly.
My patch will look like this:
world/wmo/tutorial/(Don't write textures after it, because the MTL saved the path for texture files already as textures/*****Whatever****)
Just make sure you have the correct path to where your textures are located always.
I cannot stress that enough.Then select the Open File.. button, find your .OBJ file and select it, then click convert..
If everything goes over well, it should say something about it being successful!
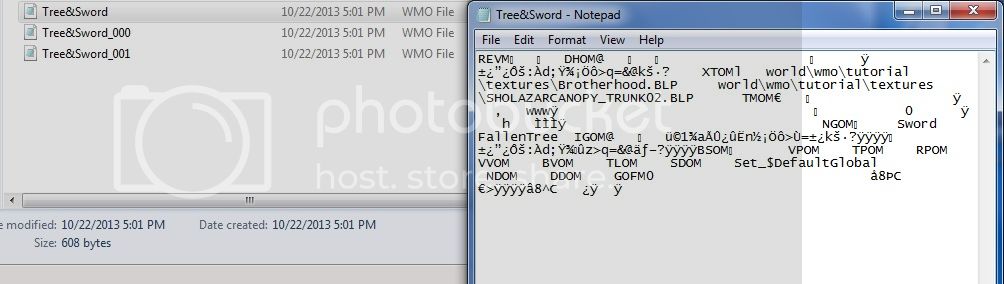
Now when you open the WMO file in notepad or something of the sort.
It should look kind of like this, if not the same.
 Step 8:
 Converting the textures to BLP's
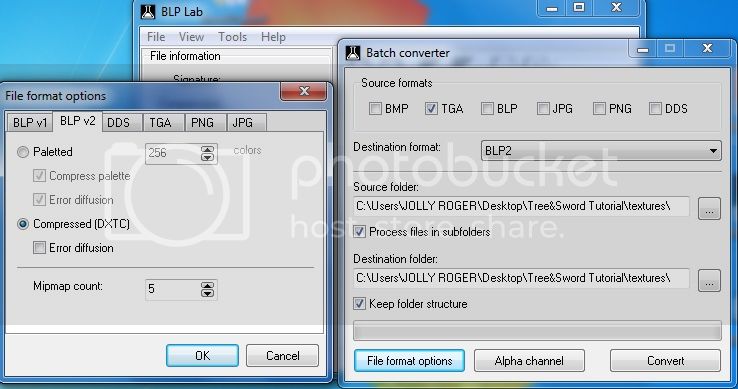
Open up BLP Lab.. and select Tools up top, and then Batch Converter (This will convert more then 1 texture at a time.)
Then we'll set the correct paths to where our textures were saved, for the Source & Destination folders.
After that, we'll want to select File Format Options, go over to BLP 2 (Seems to be the only type of BLP Noggit reads, WoW and WoW Model Viewer will read BLP 1 files, with the correct settings, google it for more info.)
Then change your settings to the one's like above in the picture.
Make sure the Alpha Channel setting, is set to "Spec Decides for you."
Then finally just click Convert, and if all goes well you should have BLP files in your texture folder.
Step 9: DBC File
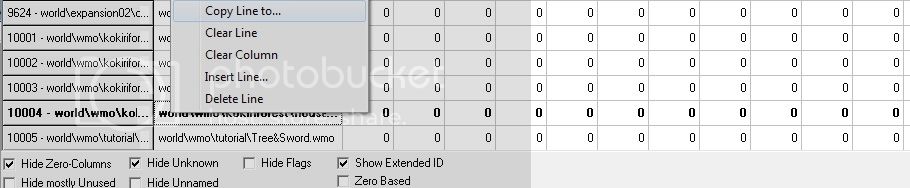
Now wherever you own your patch folder, and keep all your DB files and such, we'll be opening the GameObjectDisplayInfo.dbc with the DBC Editor..
Now search for a .WMO file, and right click the first box and a option that say "Copy Line To.." should come up, select that.
Then type in the last number that you can, like my DBC ends with 10004, you'd then type in 10005 to make sure you don't overwrite a pre-existing entry.
After that, you'll have a new line. All you'll have to edit is the very first box.
Make it so it's the exact same path of where you'll be putting your WMO, in your patch.
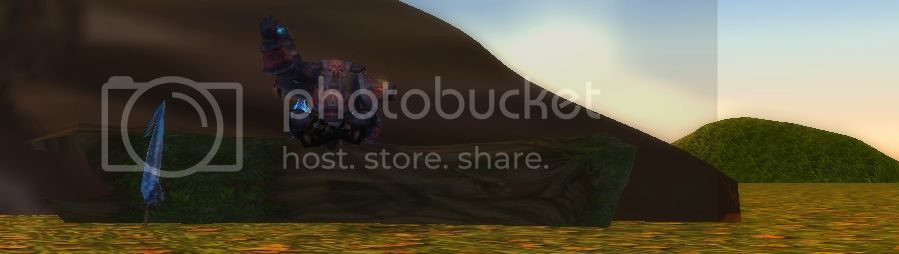
world/wmo/tutorial/Tree&Sword.wmo
See above image, for better understanding.
Then save and exit this file. But don't leave the folder.
Step 10: Applying it to a patch.
Okay, so now. Open up your patch.mpq (Whatever name it might be)
If you don't have one, just make one with the MPQ Editor.
More info, can be found in the WoW Modding tutorial, it has it's own section on the forum.
http://modcraft.io/viewforum.php?f=78But I'll assume most of you know how to patch a client
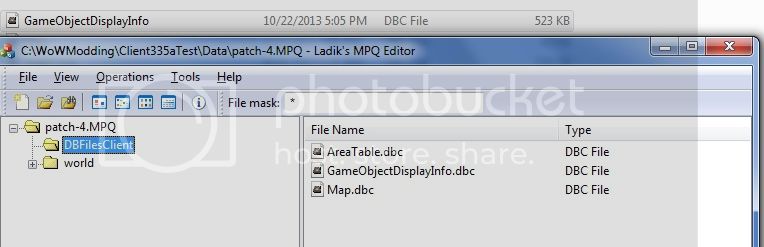
Now once we have that set up, we'll copy the GameObjectDisplayInfo.dbc into the DBFilesClient folder.
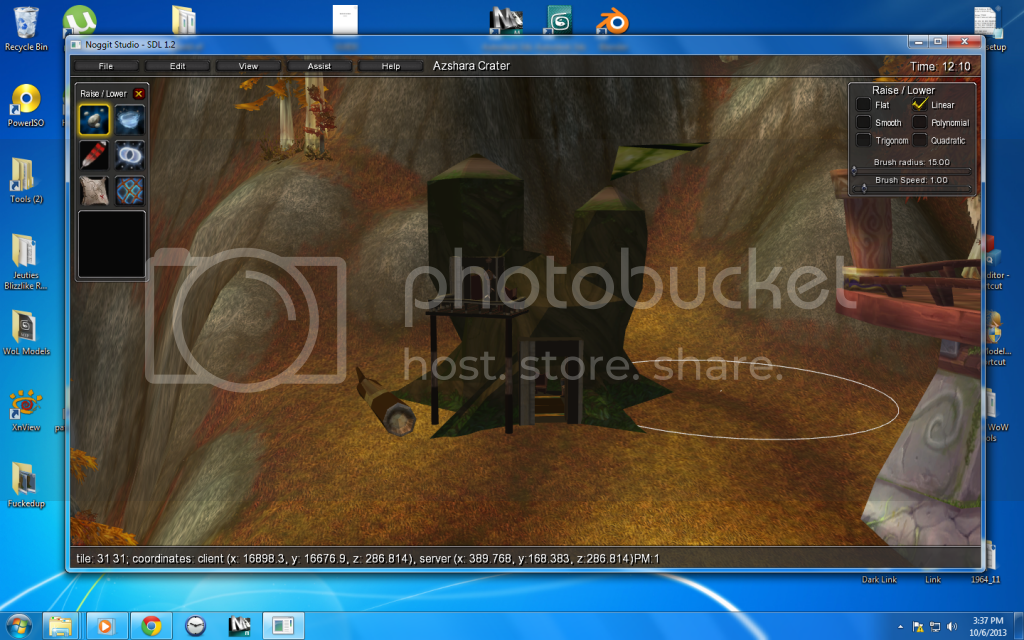
Step 11: Same with the...
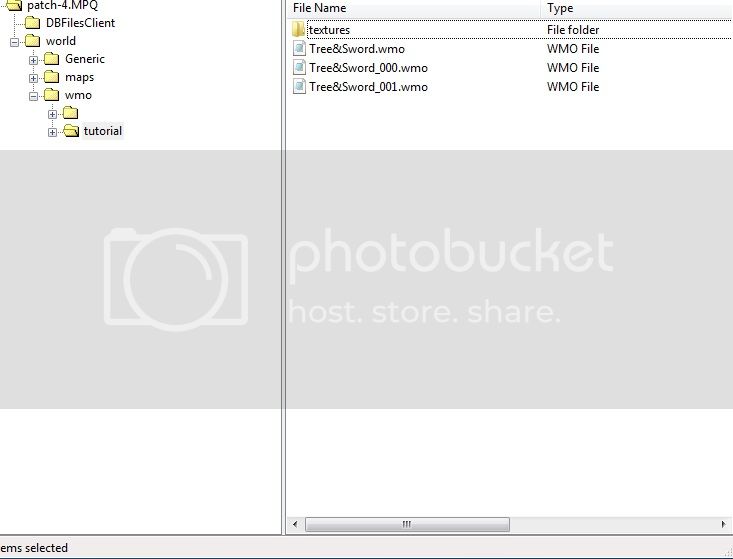
Now make sure you have the correct folder paths like the image above.
I have a folder called...
world
wmo
tutorial (This is where your files go.)
The folders must be exactly the same as the path you filled out in the DBC File and WMO Converter.
If you don't remember, open MirrorMachineQT once again, it should have saved the settings from last time along with the path you put in.
I hope I made that clear enough.
OK NOW.
Yep you guessed it... open up the folder where your WMO is located and copy all of the .WMO files, and the folder that holds your textures and drag it to the CORRECT folder world/wmo/tutorial/
Then... close out of MPQ edit when you're all done wtih that..
Assuming you have the two different folders called Client335aNoggit and Client335aTest , copy the patch you just made / edited over to the other folder so they're in both..
Then you can do what you will with it.
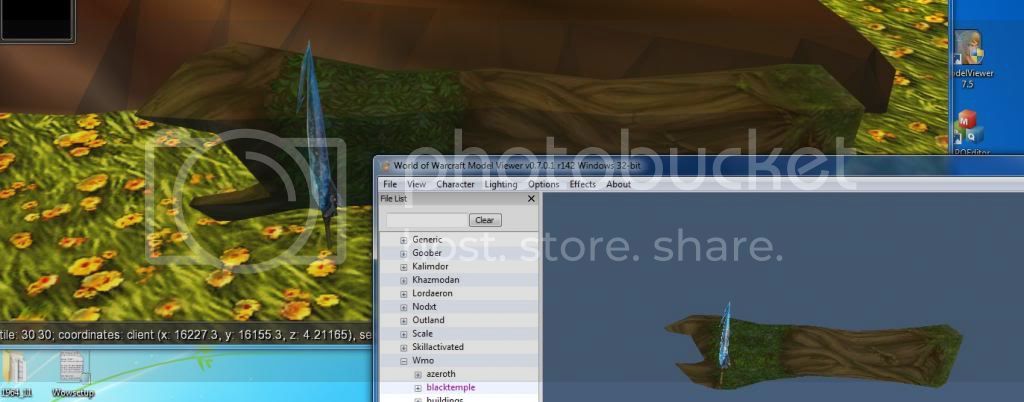
Open up Noggit and WoW Model Viewer and it should show up in there, and just press ALT + C in Noggit to have your WMO you selected show up on the map... and then you can save that map.. copy the maps to the patch again and profit.
Thanks for reading guys.. I hope this serves some purpose regarding WMO conversion