This is a read only copy without any forum functionality of the old Modcraft forum.
If there is anything that you would like to have removed, message me on Discord via Kaev#5208.
Big thanks to Alastor for making this copy!

Show Posts

This section allows you to view all posts made by this member. Note that you can only see posts made in areas you currently have access to.


Messages - PainSavior

Pages: [1] 2 3
1
Resources and Tools / Re: [TOOL] Wmo Editor - All versions
« on: January 09, 2017, 09:43:47 am »
And can some one please Mirror the latest files? I can't seem to download shit without getting massive pop-ups on the web he provided himself.

2
Resources and Tools / Re: [TOOL] Wmo Editor - All versions
« on: January 09, 2017, 09:28:59 am »
I'm having the exact same problem as above

3
Tutorials / Re: [TUTORIAL] Light Adder - How to
« on: June 21, 2014, 06:09:10 am »
Beautiful! Thank you so much for posting a tutorial on this!.. I'm definitely going to use this soon, and I'll have post what I have to show for it.

Much appreciated.

4
Modelling and Animation / [QUESTION] Some one, please..
« on: June 15, 2014, 04:42:18 am »
I wish someone with the knowledge, and willingness to help the community progress would make a Light Adder, that ACTUALLY functions PROPERLY... and SHOWS YOU what's going on, with a MANUAL maybe?

I know there's 3 different programs out or so, and NONE of them have a tutorial that anyone can read.
So please, some one.

Either reiterate how to make these programs work (Tutorial length style)...

Or maybe someone inventive could make a whole new program that features...
   The model you're viewing, real-time lighting changes to the model in a forever set area..

Please, please, please. Some one help the community out with this, we would be MOST grateful trust me, and so much more advanced as to any other forum board...

5
Showoff - what you are working on / Re: [SHOWOFF] Super Mario Model Swap
« on: November 07, 2013, 05:54:45 pm »
sweet jesus haha

6
Level Design / Re: [QUESTION] How can I rotate an ADT?
« on: November 05, 2013, 10:57:09 pm »
Well.. See I get what your saying and understand that'd take a very, very long time. Unless of course, I had knowledge of programmeing and made something to do it for me..

I figured I could just export the height map, alpha maps, texture maps, as an image, then rotate the image 180 degrees and import it back into Tallis or FuTa, but neither seem to be working. Oh. I think one of the programs, exports a .height file?.. Which I've never heard of, and google isn't bring any help either, and on the page I believe it was FuTa, there's no description on what to do with it.. lol I just thought that was funny.

Yes, export .height files! Then... do what?

7
Level Design / [QUESTION] How can I rotate an ADT?
« on: November 04, 2013, 11:17:08 pm »
Okay so, I've kinda messed up, on my postioning, and I wanted north to be south and vice versa. Is there anyway to rotate the entire adt file 180 degrees?

PLEASE don't tell me to export and import png's from tallis, the import does NOT work.

and FUTA export .height files, whcih are readable by what?

I just would like to know if it's possible to rotate an entire ADT.. ?

8
Noggit / Re: [Noggit] import problems with WMO´s
« on: October 31, 2013, 04:38:45 pm »
I also found this same problem, and you correct it by first copy an already existing WMO on the landscape and pasting it.
Then for whatever reason, noggit 1.3 will allow you to paste the current model your viewing, on the other program.

9
Modelling and Animation / Re: [QUESTION] How do lights work?
« on: October 26, 2013, 05:02:11 am »
I mean like, I know how to get to that part. I just, don't understand like the little things when I get there...
Such as .. what would be a good number for everything?
I guess I could refer to a WoW model as a guideline, but it'd help if somebody would explain each one y'know..

Like, YEAH there's a LightAdder for M2's.. but NOBODY explains which numbers to use, and what's what. Like, do all the numbers have to be 2.435 or can they just be 2, or.. how is attenuation measured?.. what are the bones? What happens if I put -1 -1 -1 for position? Y'know? Like questions like that I have with that type of thing.

I just think it'd help if there was a guideline tutorial on this subject.

10
Showoff - what you are working on / Re: [SHOWOFF] New object wow
« on: October 25, 2013, 02:25:31 am »
looks like chernobyl

11
Modelling and Animation / Re: [QUESTION] How do lights work?
« on: October 24, 2013, 07:50:03 pm »
I'm superiorly nooby with hex editing, so all of the above pretty much sounds like chinese to me haha.

If I can get it down, I promised to write a tutorial about it, in the mean-time, of some one (hint hint) going above and beyond and making the FBX conversion, or a tool that puts vertex colors to wmo's.. maybe cromon even?

12
Modelling and Animation / Re: [QUESTION] How do lights work?
« on: October 23, 2013, 09:09:36 pm »
That would be very very, progressive.

Hopefully Gamh will kill it too, 2 birds and 2 stones, nothin like options lol.
I mean, 1 bird, 2 stones. You get the point.

I'm hoping someone might be able to make a step-by-step on how to vertex color, manually.
EVEN if it is a big whimsical time loss (thanks for that word lol), I'm still interested in it cause it seems like there's not much of another option, as of right now...

I have noticed that the torch light that you hold as a weapon, lights up the WMO's.

So anyone one with the knowledge, please step forward and lend some wisdom (In a tutorial format) please :P

13
Resources and Tools / Re: [C++] LightAdder
« on: October 23, 2013, 02:20:07 am »
Could you share a download for the M2 file, just to use as a guideline.

14
Modelling and Animation / Re: [QUESTION] How do lights work?
« on: October 23, 2013, 01:10:04 am »
Okay, okay. So it is possible VIA hex editing... I get it. But this would one vertex at a time which would be a giant waste of time I guess.

So, in the mean time of waiting for us to be able to convert something that allows vertex colors to WMO format.

What would be the best rigged-fix? In terms of managable, simplicity, and times-sake.
The idea of using m2s (With a larger light span)?

15
Tutorials / [TUTORIAL] How I convert OBJ's to WMO w/3Ds Max 2013
« on: October 23, 2013, 12:41:15 am »
Well hi everyone, I'm just going to start out by saying, this is just my way of doing this.
I hope it serves as a guidline for your progress in making WMO's correctly.


     Thesis:
          This is a step-by-step tutorial on how to
A.) Convert OBJ's to WMO's using the provided resources and 3DS Max 2013 / Blender.
B.) Write the DBC entry.
D.) Apply the Patch.

ALSO I'm assuming you've already went ahead and done this guide fullly : http://modcraft.io/viewforum.php?f=78


Step 1:

          Things you'll need(If you have a different version of MPQ edit, that should suffice.)
3ds/OBJ to WMO
BLP Lab
MyDbcEditor
MPQEdit3.2
Tree&Sword Tut OBJ

So.. after gathering all the resources above and having your OBJ ready to go..

Step 2: We're going to open up 3D's max, or even Blender if you want, but I'll be showing max.
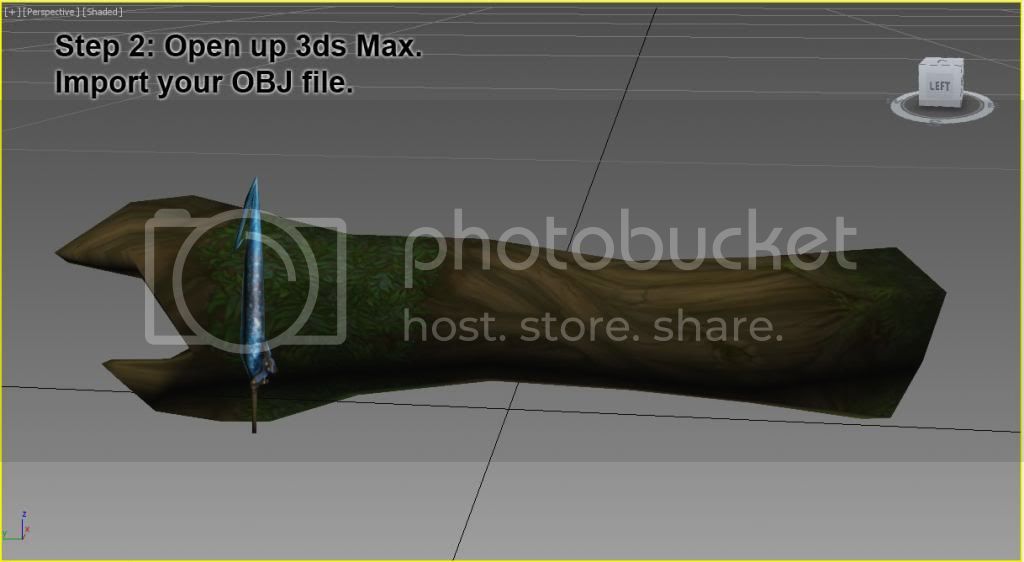
The image speaks for itself.

Step 3:
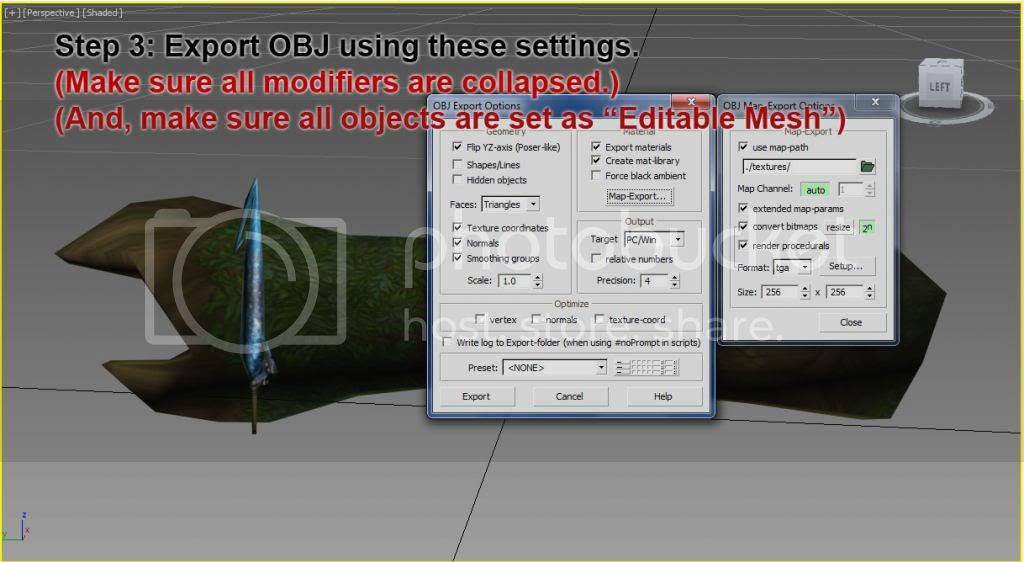
These settings seemed to have never failed for me.
The panel on the right hand side, can be done differently, this is just to export your textures as whatever file type you might like, and place that right beside where the OBJ will be exported in the ./textures/ folder, you can change the name to whatever you want, but be sure you remember the path layout, you'll be needing it later.

More Info: http://egamh9.net/dev/mm/index.php

Step 4:

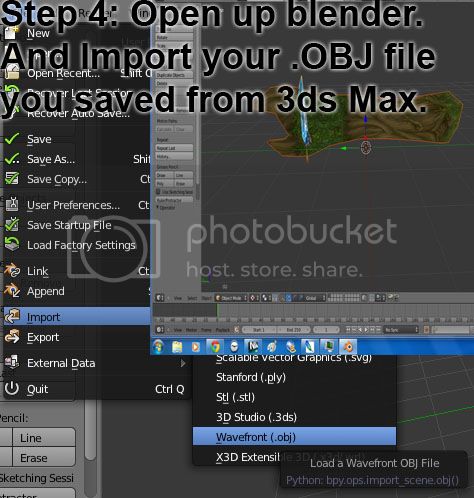
So after exporting froms 3ds max, we'll be opening that same OBJ file, with Blender.
Just select from the drop-down up top.. File > Import > Wavefront (.OBJ)
After it's imported and in your view, make sure the object is the correct way, otherwise when you try to place it in Noggit, the model will be rotated the wrong way and just a mess of problems.

Step 5:
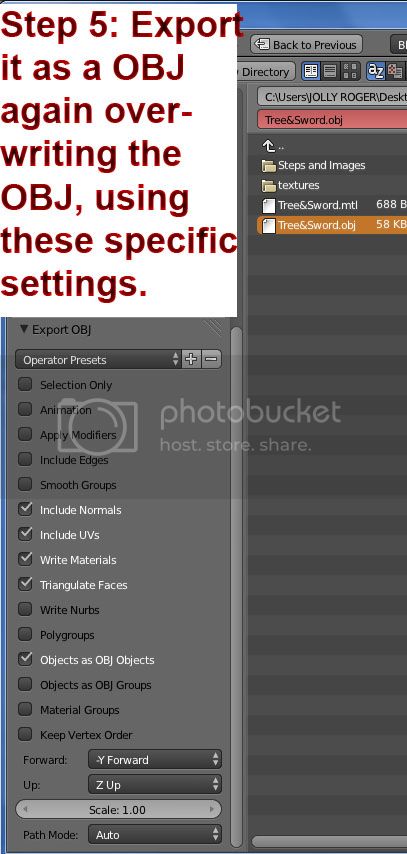
After importing and having the model the right way.
We'll be exporting the model, using these exact settings.
This is not Burker King. You can't have it your way.
Then exit Blender.

Step 6:
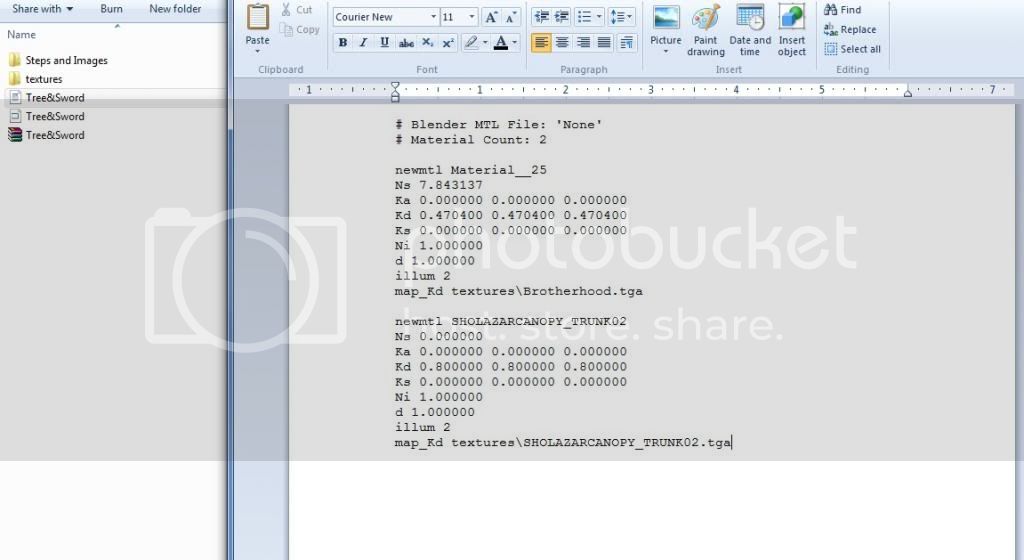
Now, locate the OBJ file that you just finished exporting again from Blender.
There will be a .MTL file next to the .OBJ file, this file tell which materials use which textures.
When you open the file, there will be triplicates of the texture names.. such as..
Quote
map_Kd texturesBrotherhood.tga
map_Ka texturesBrotherhood.tga
map_d texturesBrotherhood.tga

We only use map_Kd in our file, so you can delete the extra 2 lines.
Do this for every material in the file and save the text and close out.

Step 7:
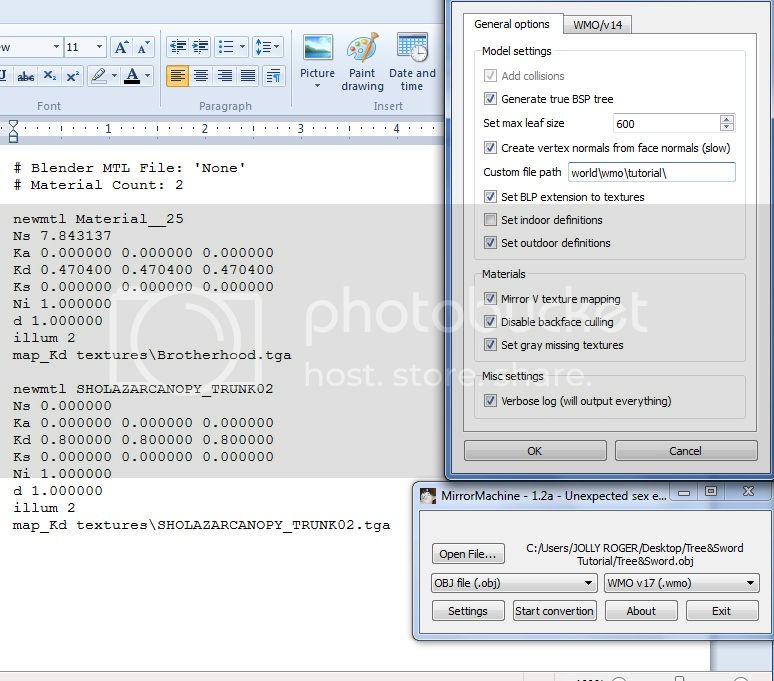
Now, you'll be opening 3ds/OBJ to WMO (MirrorMachineQT).
Select the Settings, and set them as so for this model.
Detail on why these settings are the way they are can be found : here.

One VERY important thing though, always make sure, your file path is set correctly.
My patch will look like this:
world/wmo/tutorial/(Don't write textures after it, because the MTL saved the path for texture files already as textures/*****Whatever****)
Just make sure you have the correct path to where your textures are located always.
I cannot stress that enough.


Then select the Open File.. button, find your .OBJ file and select it, then click convert..
If everything goes over well, it should say something about it being successful!

Now when you open the WMO file in notepad or something of the sort.
It should look kind of like this, if not the same.


Step 8: Converting the textures to BLP's
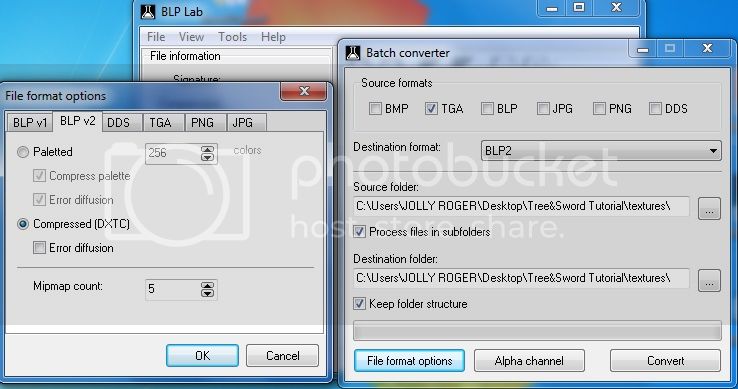
Open up BLP Lab.. and select Tools up top, and then Batch Converter (This will convert more then 1 texture at a time.)

Then we'll set the correct paths to where our textures were saved, for the Source & Destination folders.

After that, we'll want to select File Format Options, go over to BLP 2 (Seems to be the only type of BLP Noggit reads, WoW and WoW Model Viewer will read BLP 1 files, with the correct settings, google it for more info.)

Then change your settings to the one's like above in the picture.
Make sure the Alpha Channel setting, is set to "Spec Decides for you."

Then finally just click Convert, and if all goes well you should have BLP files in your texture folder.

Step 9: DBC File

Now wherever you own your patch folder, and keep all your DB files and such, we'll be opening the GameObjectDisplayInfo.dbc with the DBC Editor..

Now search for a .WMO file, and right click the first box and a option that say "Copy Line To.." should come up, select that.

Then type in the last number that you can, like my DBC ends with 10004, you'd then type in 10005 to make sure you don't overwrite a pre-existing entry.

After that, you'll have a new line. All you'll have to edit is the very first box.
Make it so it's the exact same path of where you'll be putting your WMO, in your patch.
world/wmo/tutorial/Tree&Sword.wmo

See above image, for better understanding.

Then save and exit this file. But don't leave the folder.


Step 10: Applying it to a patch.

Okay, so now. Open up your patch.mpq (Whatever name it might be)
If you don't have one, just make one with the MPQ Editor.
More info, can be found in the WoW Modding tutorial, it has it's own section on the forum.
http://modcraft.io/viewforum.php?f=78

But I'll assume most of you know how to patch a client

Now once we have that set up, we'll copy the GameObjectDisplayInfo.dbc into the DBFilesClient folder.

Step 11: Same with the...
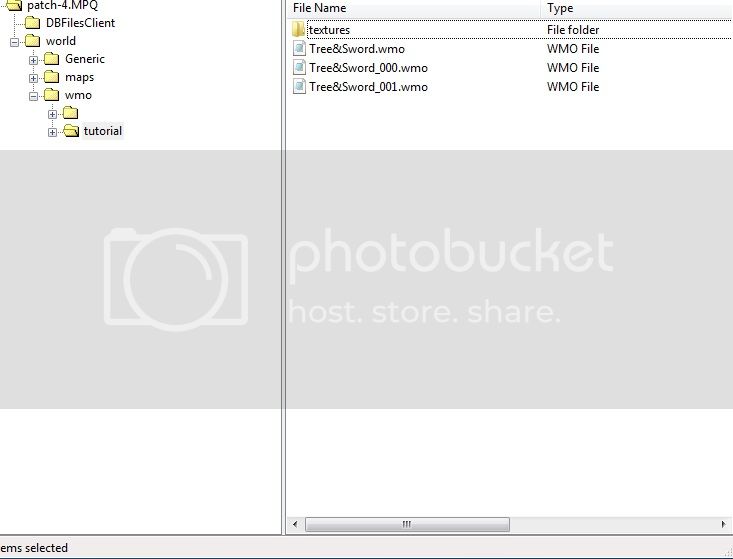

Now make sure you have the correct folder paths like the image above.
I have a folder called...
world
     wmo
         tutorial (This is where your files go.)

The folders must be exactly the same as the path you filled out in the DBC File and WMO Converter.
If you don't remember, open MirrorMachineQT once again, it should have saved the settings from last time along with the path you put in.

I hope I made that clear enough.

OK NOW.

Yep you guessed it... open up the folder where your WMO is located and copy all of the .WMO files, and the folder that holds your textures and drag it to the CORRECT folder world/wmo/tutorial/

Then... close out of MPQ edit when you're all done wtih that..
Assuming you have the two different folders called Client335aNoggit and Client335aTest , copy the patch you just made / edited over to the other folder so they're in both..

Then you can do what you will with it.
Open up Noggit and WoW Model Viewer and it should show up in there, and just press ALT + C in Noggit to have your WMO you selected show up on the map... and then you can save that map.. copy the maps to the patch again and profit.
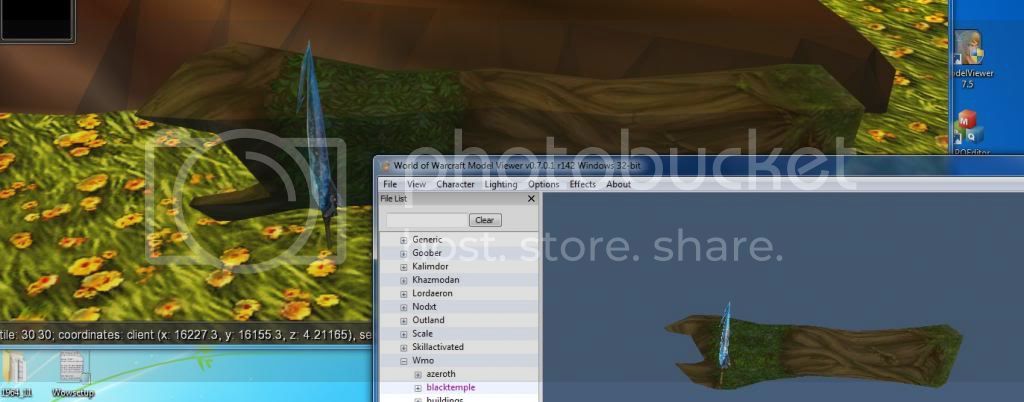


Thanks for reading guys.. I hope this serves some purpose regarding WMO conversion


Pages: [1] 2 3