This section allows you to view all posts made by this member. Note that you can only see posts made in areas you currently have access to.
Topics - Tigurius
Pages: [1]
1
« on: August 06, 2011, 09:59:12 pm »
Set your nature Creatures: into Fire: into Fire: 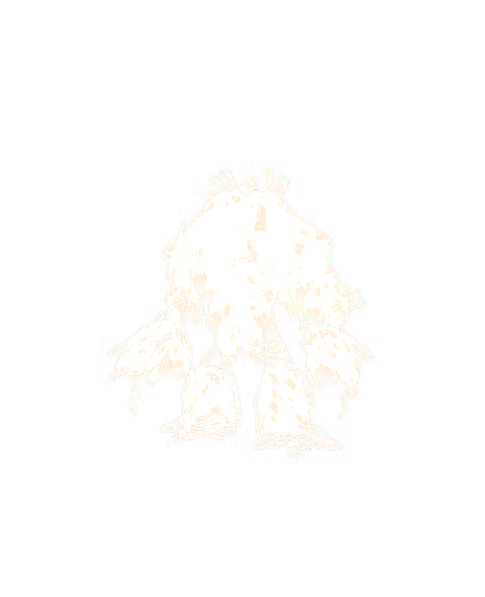 Note: This will teach you how to create texture animations, how to setup additional materials and what to do with the renderflags. 1. Get your model. 2. Search for a texture which is like you want the flames(or ice, poison w/e) I used: WORLDEXPANSION02DOODADSHOWLINGFJORDFIREFXT_VFX_FIRE_ANIM02_128_FULL_DESAT.BLP 3. Open your model in PyModelEditor 4. Change the textures of the body of your model to your texture. Note: X- and Y-Wrap give sometimes a better effect. 5. Add a GlobalSequence for your TextureAnimation 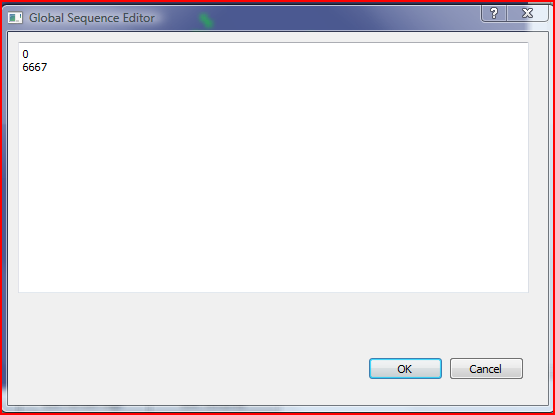 6. Add an UV(==TextureMapping)-Animation 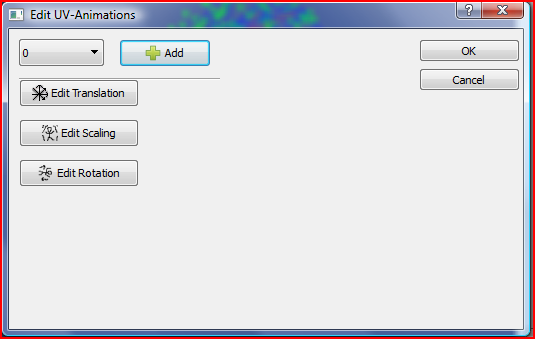 7. There create a Translation-Block like 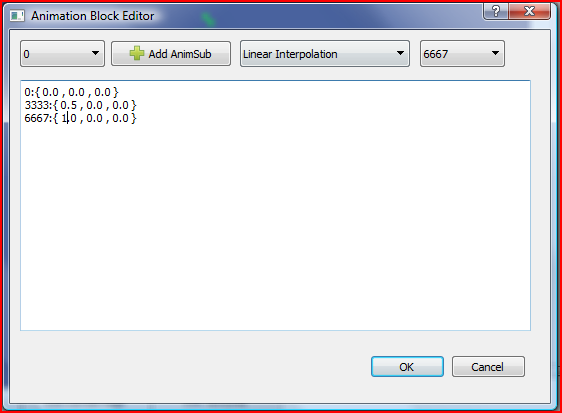 and a Scaling-Block like 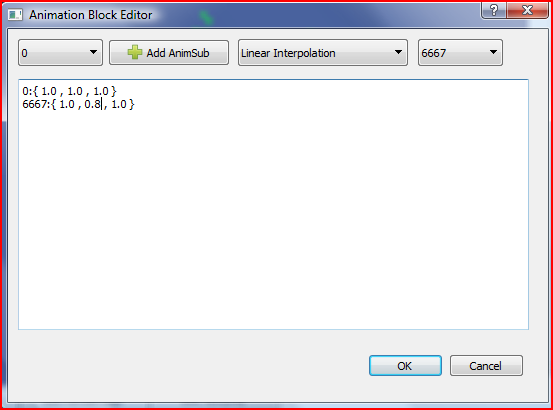 8. Add/Change a Renderflag to Modulate 2x (to remove the black parts of the texture) 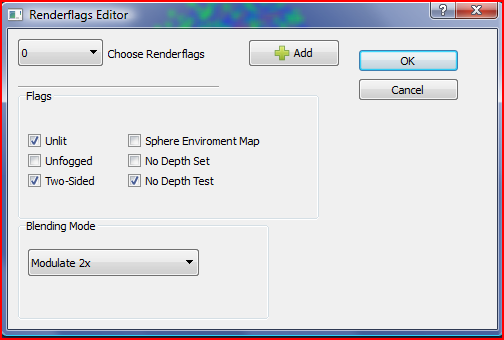 9. Add a new Material for each geoset and give them the animationparameter. 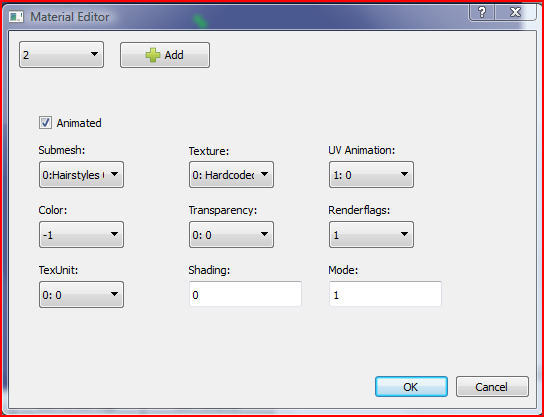 10. Fine you are done. Gratulations to your flaming creature. File: http://www.file-upload.net/download-364 ... r.zip.htmlResult: 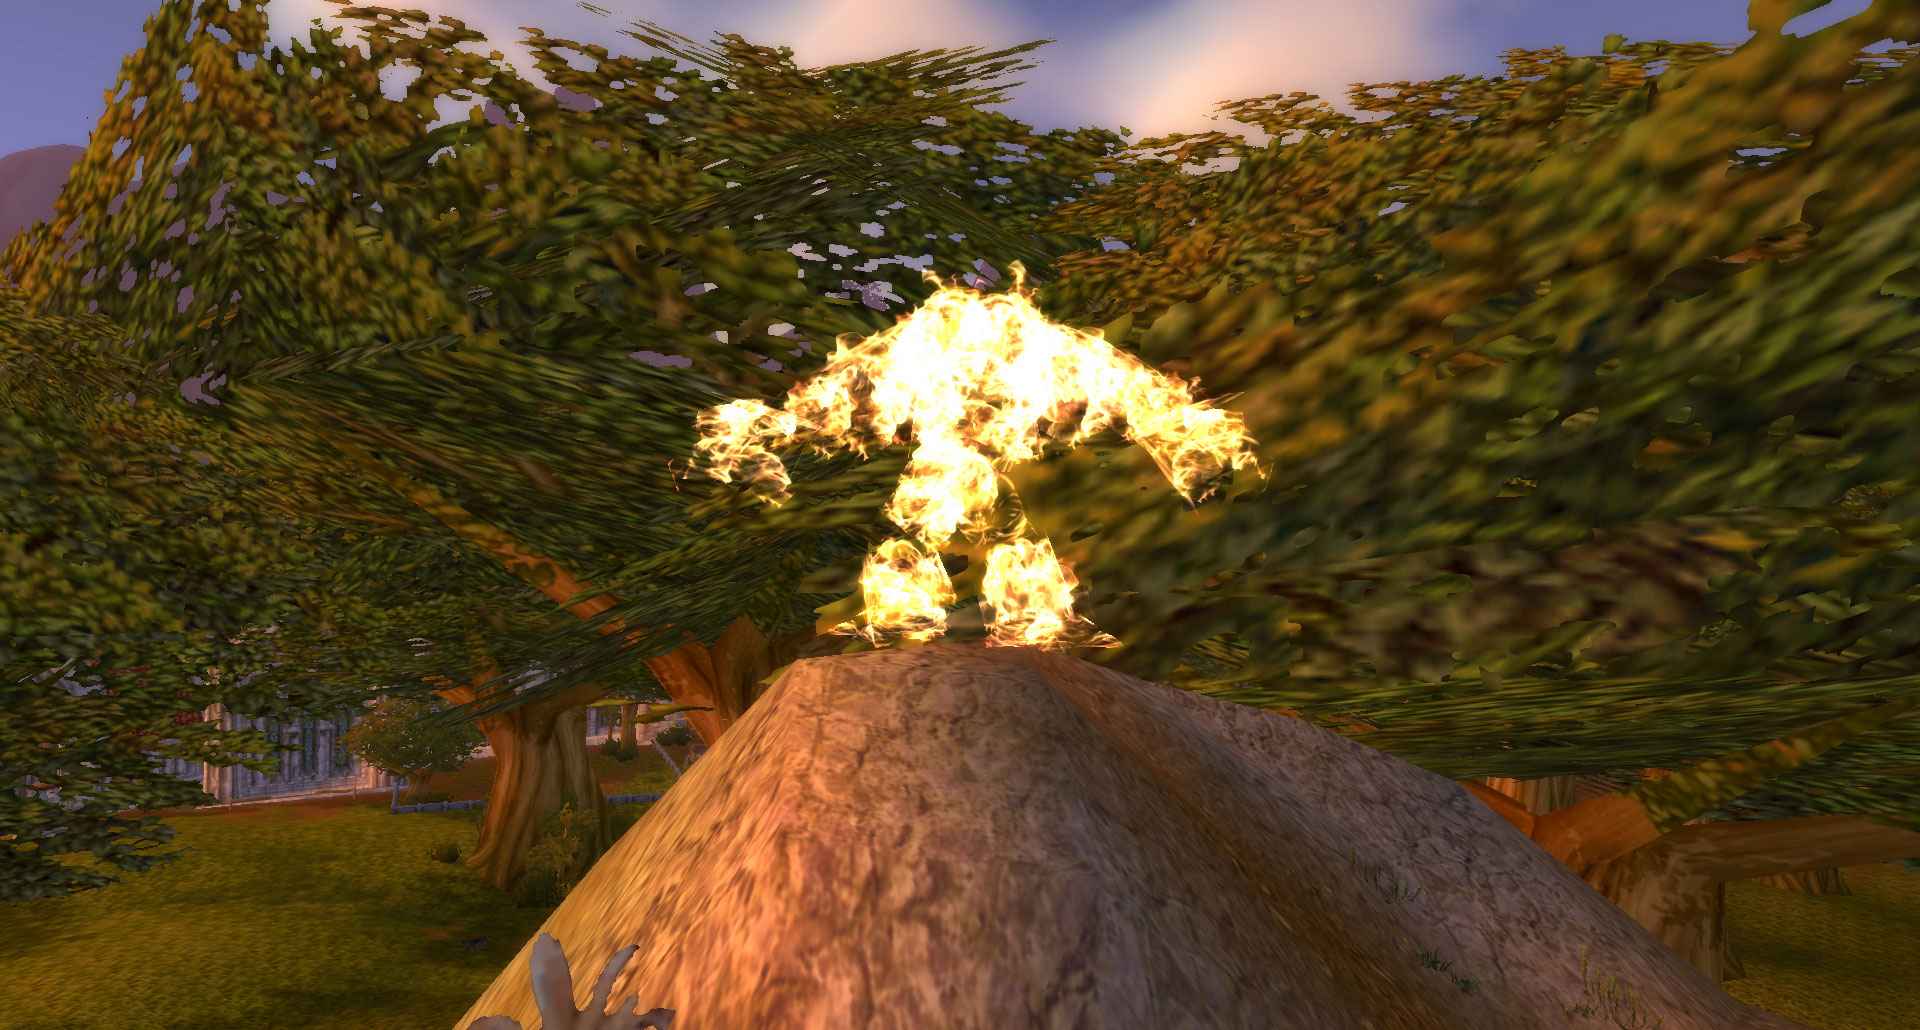
4
« on: December 15, 2010, 05:09:56 pm »
[center:uoihgkyq]  [/center:uoihgkyq] You can commit any winterthemed Areachange/Worldbuild. One entrie per user. Deadline: 31. Dezember 2010 Winner Award: Implementation of a (little) worldbuilding tool of your idea. Inspiration: [center:uoihgkyq]   [/center:uoihgkyq]
5
« on: November 19, 2010, 12:47:09 am »
Yes, it's just another WDTEditor. Available Features: *Creating and Editing of WDTs *Adding and Removing of ADT Entries *Adding and Removing of WMO Entry *Use the Wotlk alpha map format or not *Use the wotlk color shaders Missing Features: *WMO DoodadSets *WMO NameSets *WMO Extends Calculation  Download: http://www.file-upload.net/download-298 ... se.7z.html
6
« on: September 29, 2010, 12:57:50 am »
In this tutorial I will show you how to add animated textures to a model. Animated textures can eg be found on the clouds in character selection screen or is used for the floating "lava" effect on Goshujinsamas Dark Matter Blade. Here I show, how I added the effect to the Dark Matter Blade (it's also the Test.m2 which is distributed with PyModelEditor) I'm adding the effect via PyModelEditor, but this can be also done via hexediting  So first to the Interface of PyModelEditor:  The "Open File" Button is used to open a *.m2 file. The Buttons where the big red arrow points to, are used to open the different editors. So now we've opened the Dark Matter Blade in the Editor and the first thing we need, is to know, to which geoset we want to add the effect. Therefore we open the geoset editor and check which geoset is the blade.  -> Geoset Number 1 (the numeration of the geoset is 0,1,2...) Now we need to add the Texture we want to animate on the blade to the model: 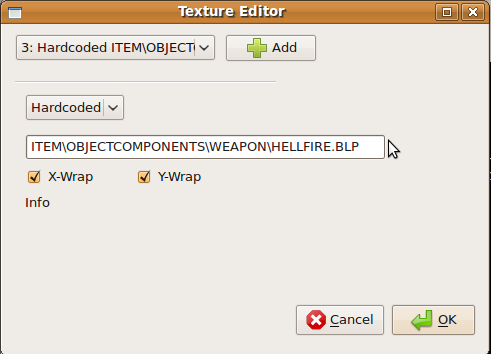 Hardcoded is used for textures that can't be changed via DBC or ingame via Cloth change. (the x and y-wrap is used to make the animation fluent) As we want the texture animation continual, and not for each animation a different one, we add a Global Sequence to the model  At this point, we implement how the texture animates:  We use the translation for the flow of the lava. In the first comboBox is no entry, so we need to add an AnimSub. As interpolation type we choose "Linear Interpolation". The fourth comboBox is for the GlobalSequence. The format of the AnimEditor is: "Timestamp":"Value" To define how the animated texture layer is blended on the primer, we add a new renderflag:  Now we have everything prepared, so we can add finally the texture layer:  You need to set the "animated flag", choose the correct submesh, texture, uv animation and renderflag. So now you've got an animated texture in your model.
7
« on: July 28, 2010, 12:24:23 pm »
So this is the Alpha Version, I'll release. It has been tested under Ubuntu and Windows Vista until now, but it should run under every OS where a Python Interpreter and PyQt is available. Things you need: Python 2.6.x (other versions may work aswell)PyQt4PyOpenGL (most likely)Currently, it's mighty enough, to add animated textures to models: 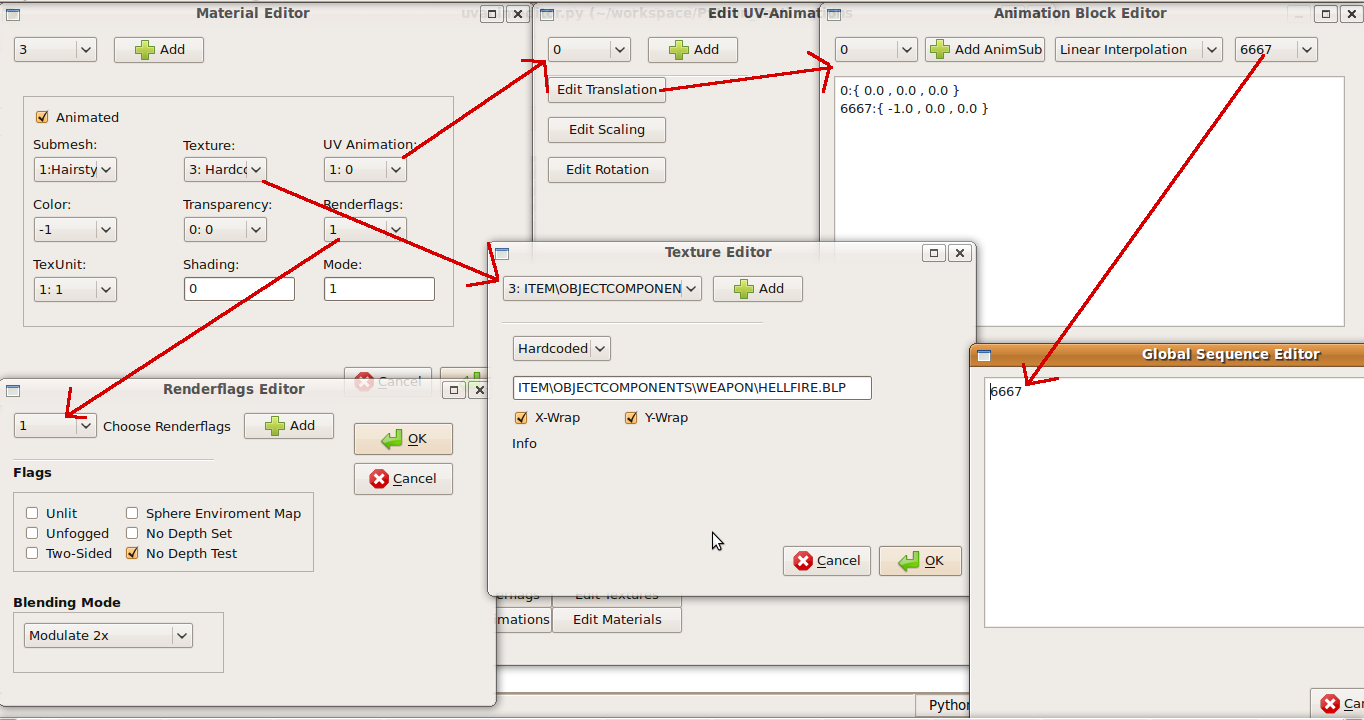 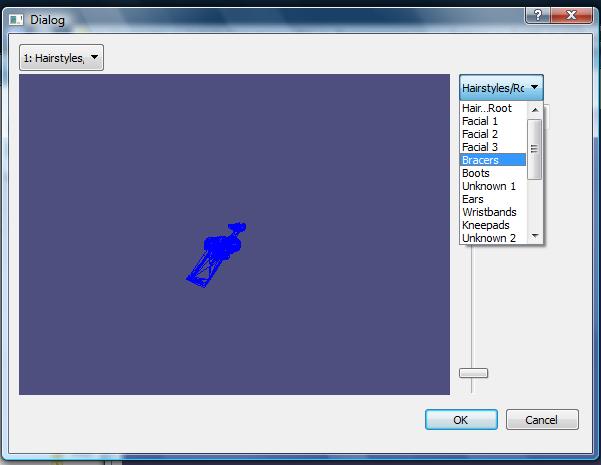 Atm it has no global m2, so you need to edit the things one after another (it doesn't update globally, yet). Big models, like Character ones, may need some time to load. Run it via the startme.py file. DownloadLast Changes: *Added LightEditor *Added SequenceEditor *Bugfixes Old Versions: DOWNLOAD NOW!Old: http://www.file-upload.net/download-2593348/pymodeleditor.zip.htmlOlder: File-Upload.net - PyModelEditor-AlphaRelease.zip
8
« on: March 28, 2010, 02:31:52 pm »
Things needed: * PyM2: http://code.google.com/p/pym2/source/browse/* A Python Interpreter: http://www.python.org/* A texteditor (like Notepad++) Notes to Python: # starts a comment indentations are used for block delimitations To use PyM2 you need to include the files in your Python-Code: from m2 import * # imports the whole m2.py file without the use of namespace
from skin import * #the same for skin
import m2 #imports m2.py, but you have to use eg m2.M2File to access the parts of the file
Now you can use the imported files. Example 1: Displaying of the texture types #! /usr/bin/python
from m2 import *
#Dictionary for Texture types
TextureTypes = { 0 : "Hardcoded" , 1 : "Body/Clothes" , 2 : "Items", 3 : "ArmorReflect?", 6 : "Hair/Beard",
8 : "Tauren fur", 9 : "Inventory Art 1", 10 : "quillboarpinata", 11 : "Skin for creatures or gameobjects 1",
12 : "Skin for creatures or gameobjects 2" ,13 : "Skin for creatures or gameobjects 3", 14 : "Inventory Art 2"}
#open m2
m2 = M2File("HumanMale.m2")
#iterate through textures
for i in m2.textures:
print "Type is " + TextureTypes[i.type] #print texture type
print i.name #print texture filename
Example 2: Change the Color of all particles to Green from m2 import *
filename = "YourM2.m2"
m2 = M2File(filename ) #open YourM2.m2
#iterate through the particles
for i in m2.particle_emitters:
#iterate through the elements of the Color-FakeAnimationBlock
for j in i.color.Keys:
j.x = 0 #red
j.y = 255 #green
j.z = 0 # blue
m2.write(filename) #write the m2
Example 3: Display the Geoset Types from skin import *
#Create Dictionary for Translating Ids
GeosetTypes = { "00" : "Hairstyles", "01" : "Facial1", "02" : "Facial2", "03" : "Facial3",
"04" : "Bracers", "05" : "Boots", "06" : "Unknown1", "07" : "Ears", "08" : "Wristbands", "09" : "Kneepads",
"10" : "Unknown2", "11" : "Pants", "12" : "Tabard", "13" : "Trousers/Kilt", "14" : "Unknown3",
"15" : "Cape", "16" : "Unknown4", "17" : "Eyeglows", "18" : "Belt" }
#Open SkinFile
sk = SkinFile("VrykulMale00.skin")
#Iterate through the Geosets
for i in sk.mesh:
s = str(i.mesh_id)#Convert the GeosetId to a string
j = len(s)#Get the Length of the string
if (j<3):#If it's only two digits...
s = "00"#the Id is 00
elif(j<4):#if it's length is <4, then it has only one digit
s = "0" + s[0]
else:#get the two important digits
s = s[0:2]
print str(i.mesh_id) +" is " + GeosetTypes[s]#print mesh_id and it's translation
Example 4: Tilting is Tilt from m2 import *
print "Please insert Modelname:"
filename = raw_input() #get input
m2 = M2File(filename) #open m2
print "Insert Tilting ( 0 = no tilt, 1 = x-tilt, 2 = y-tilt, 3 = xy-tilt)"
tilt = int(raw_input()) #Get input and convert to int
m2.hdr.modeltype |= tilt #non-exclusive or: 001010 | 010001 = 011011
m2.write(filename) #write m2
9
« on: February 09, 2010, 06:09:57 pm »
HowTo: Convert WC3(mdx) to WoW(m2) models! Needed Tools: For WC3: blplab MdlxConv For WoW: BLPConverter ConverterMDX To Convert the BLP from Version 1.0(WC3) to 2.0(WoW): Open the BLP1 with blplab and save it as PNG, then convert the PNG with BLPConverter to BLP2. To Convert the Model: If your model is missing important parts(like Bones,Transparency etc.): Convert the MDX with MdlxConv to MDL and open the MDL in Notepad. Textures: You might need to add them by hand, the code is: Textures 1 {
Bitmap {
Image "CustomItemdmT.blp",
}
}
Transparency: For every Geoset you need: GeosetAnim {
Alpha 1 {
DontInterp,
0: 1.000000,
}
GeosetId 0,
}
Sequences/Anims: You need atleast one: Sequences 1 {
Anim "Stand" {
Interval { 0, 3333 },
MinimumExtent { -0.656940, -2.999150, -2.449310 },
MaximumExtent { 0.550530, 21.822701, 1.284070 },
BoundsRadius 12.463241,
}
} Materials: Should also be included(Renderflags...): Materials 1 {
Material {
Layer {
FilterMode None,
static TextureID 0,
}
}
} Bones: Atleast one Bone must be in the model: Bone "objHandle" {
ObjectId 0,
GeosetId 0,
GeosetAnimId None,
} Now convert it to MDX again(or try if it works with mdl,sometimes it doesn't) and open up a cmd-Window(shift+Left-Click). Then type: ConverterMDX <MDX> [optional: scale] Then the Converter will ask you some Questions(like AnimationIDs etc.), the AnimationIDs can be found in AnimationData.dbc NextAnimation can be -1 or the next Animation(...) subAnimID=which one of a row of Anims this is Camera Types are: Potrait = 0, CharInfo = 1, else -1 Attachments are: typedef enum <uint32>{
Mountpoint_or_LeftWrist =0,
Right_palm,
Left_palm,
Right_elbow,
Left_elbow,
Right_Shoulder,
Left_Shoulder,
Right_Knee,
Left_knee,
unk1,
unk2,
Helmet,
Back,
unk3,
unk4,
Bust,
Bust2,
Face,
Above_Char,
Ground,
Top_of_head,
Left_Palm2,
Right_Palm2,
unk5,
unk6,
unk7,
Right_Back_Sheath,
Left_Back_Sheath,
Middle_Back_Sheath,
Belly,
Left_Back,
Right_Back,
Left_Hip_Sheath,
Right_Hip_Sheath,
Bust3,
Right_Palm3,
unk8,
demolishervehicle1,
demolishervehicle2,
Vehicle_Seat1,
Vehicle_Seat2,
Vehicle_Seat3,
Vehicle_Seat4,
unk9,
unk10,
unk11,
unk12,
unk13
}ATTACHMENT_ID; where the first one is 0, the second 1 etc. Now just place all the files in the correct paths and you're done. Fine. Download for all tools: http://www.file-upload.net/download-2242639/ConvPack.zip.html
Pages: [1]
|
