In this tutorial I will show you how to add animated textures to a model.
Animated textures can eg be found on the clouds in character selection screen or is used for the floating "lava" effect on Goshujinsamas Dark Matter Blade.
Here I show, how I added the effect to the Dark Matter Blade (it's also the Test.m2 which is distributed with PyModelEditor)
I'm adding the effect via PyModelEditor, but this can be also done via hexediting

So first to the Interface of
PyModelEditor:

The "Open File" Button is used to open a *.m2 file.
The Buttons where the big red arrow points to, are used to open the different editors.
So now we've opened the Dark Matter Blade in the Editor and the first thing we need, is to know, to which geoset we want to add the effect. Therefore we open the geoset editor and check which
geoset is the blade.

-> Geoset Number 1 (the numeration of the geoset is 0,1,2...)
Now we need to add the
Texture we want to animate on the blade to the model:
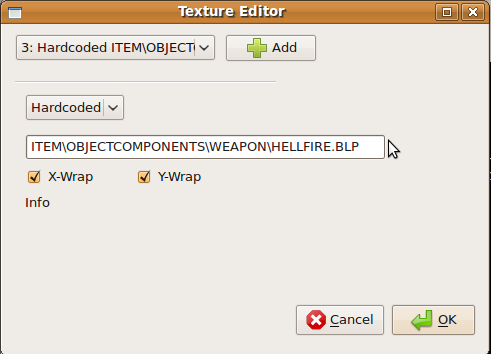
Hardcoded is used for textures that can't be changed via DBC or ingame via Cloth change.
(the x and y-wrap is used to make the animation fluent)
As we want the texture animation continual, and not for each animation a different one, we add a
Global Sequence to the model

At this point, we implement how the
texture animates:

We use the translation for the flow of the lava.
In the first comboBox is no entry, so we need to add an AnimSub.
As interpolation type we choose "Linear Interpolation".
The fourth comboBox is for the GlobalSequence.
The format of the AnimEditor is:
"Timestamp":"Value"
To define how the animated texture layer is blended on the primer, we add a new
renderflag:

Now we have everything prepared, so we can add finally the
texture layer:

You need to
set the "animated flag", choose the correct
submesh,
texture,
uv animation and
renderflag.
So now you've got an animated texture in your model.

