
Introduction
This tool will allow you to make model edits to World of Warcraft's M2 files.
Example:

Downloads
Blender 2.62 Windows x32Blender 2.62 Windows x64Blender 2.62 Mac OS XBlender 2.62 LinuxM2Mod4 (
Mirror)
M2Mod3 (3.3.5a) It works around M2I files. M2I stands for M2 Intermediate, and is a file format that was developed for this tool, and contains only the data relevant to that which we want to edit, which is meshes, bones, attachments, and cameras.
The core steps to making a mod are:
Convert the M2 to an M2I.

Import the M2I into Blender.
Make edits.
Export the M2I from Blender.
Merge the original M2 with the modified M2I to produce the final modded M2.
If you don't use Blender, you'll have to write your own import/export scripts for the M2I files. Included with the main package is documentation on the M2I file format so you can do this.
You may edit meshes however you want. You can edit vertex weights, vertices, UVs, subdivide, split, extrude, sculpt, etc. Just about anything that Blender will let you do to the mesh you can do safely without worrying about breaking the model. As long as you export a triangulated mesh, the tool can take care of the rest. You can even edit bone positions, attachment positions, and cameras. Under the hood, M2Mod rebuilds the skin files from scratch, and this lets you edit the mesh however you want with few limitations.
special thanks to Trollpaxton who shared the source code for his M2 mod tool which served as a great reference point for this tool, especially with fixing animation offsets.
special thanks to the wowdev and source peek wikis and whoever edits those pages with the reverse engineered file format information needed to make something like this possible.
thanks to everybody on Darknest who makes mods.
thanks to everybody on Darknest who uses mods.
Common Questions and Tips
Q. What is an M2 file?
A. An M2 file is the 3D model file format created by Blizzard and used by WoW. It has gone through several revisions over each release of a new WoW expansion. This current version of M2Mod is made to work with Cataclysm version M2s, which happen to be the same version as those used in Pandaria (for the most part anyway).
Q. What is an M2I file?
A. An M2I file is an intermediate and slimmed down format for making edits to M2 files. It makes importing and exporting from 3D software easy because it doesn't have all the extra data that has no place to belong within Blender.
Q. How come I can't use M2Mod with the Pandas?
A. This race is not supported yet.
Q. What version of Blender should I used with M2Mod?
A. Currently M2Mod only works with Blender 2.62, I've been too busy to bother with keeping the M2I import/export scripts up to date.
Q. How do I extract original M2 files?
A.
It is possible to extract original M2 files from model.MPQ, but if Blizzard has released an update that patches those M2 files then that patch data will be stored in one or more of the the wow-update-base-x.MPQs. So to extract a fully patched and up-to-date M2 (which you should always do before you start editing, because only the up-to-date M2s will have new animations and what not):
1. Grab Ladik's MPQ Editor.
2. Run it.
3. Go to File->Open MPQ(s) With Options ... [Ctrl+Shift+O].
4. Browse to WoW's data folder (might be at C:Program Files (x86)World of WarcraftData) and multi-select model.MPQ and all of the wow-update-base-x.MPQ files (but don't select any custom user-made MPQs you might have).
5. Hit Open.
6. Another window will show up, and select Patched mode (and optionally check Read-only mode) and then hit OK.
Now you can just drag and drop the files from the MPQ onto your computer somwhere
Q. How do I use the M2I import/export scripts with Blender?
A.
1. To install the scripts, copy the included "scripts" folder to:
%appdata%BlenderFoundataionBlender2.62
(or you can copy them to Blender's install folder as well)
2. Once they are there, they will have to be enabled from within Blender, so open up Blender and go to:
File->User Preferences and then go to the Addons tab
and then enable Import-Export: Export: M2 Intermediate (.m2i) and Import-Export: Import: M2 Intermediate (.m2i)
Then click Save As Default so the scripts will always be enabled whenever you open Blender
Now you should be to import and export M2Is from File->Import->M2 Intermediate (.m2i) and File->Export->M2 Intermediate (.m2i)
Tip: Always treat M2 files and their SKIN files like a single file. If you copy or move an M2 between folders or MPQs, always bring it's SKIN files along with it; an M2 won't work without them.
Tip: M2I is designed and tested to work only with character M2s. It may or may not work with other kinds of M2s used for items or environments or doodads etc.
Tip: A working knowledge of using Blender and making 3D models is required. I can't teach you how to use Blender. Take the initiative to teach it to yourself

How to update v3 WotLK model edits to v4 Cata
and how to update models when a minor patch comes out
This is a guide for model editors who want to update their old model edits that they made for WotLK to Cata.
In this document, I use the terms v3 to refer to WotLK and v4 to refer to Cata.
The M2 and M2I formats have been change with the transition from v3 to v4. M2I's made with the last version of M2Mod will be called v3 M2I's, whereas the current version of M2Mod makes v4 M2I's. Also, v3 M2's refers to the last version of M2 pre-patch 4.0, and v4 M2's are the current version.
Remember that any time and M2 file is mentioned, it really means the M2 file plus it's SKINs files. These files should always be treated as one. So when you extract an M2 from an MPQ, always also extract the SKIN's along with it.
Method 1
This method will probably work in most all cases. It involves just using M2Mod to merge a new original v4 M2 (from art.MPQ) with the modified v3 M2I (or v4 M2I) (from your existing mod project) as you normally would, and then you will get a modified v4 M2 that you can put into a patch.
When using this method, make sure that IgnoreExtras is enabled and IgnoreMaterials is enabled, this will ensure that all the parts other than geometry gets updated to v4. IgnoreMaterials is bugged on some models, in which case you might have to remake your edit using Method 2.
Method 2
If the first method doesn't work or problems arise when you get your modified M2 into the game, then it is probably because there were some changes made to the model from WotLK to Cata (such as bones or attachments were added or removed). This method will let you work around those deeper changes, but it involves a bit more work in Blender. It's a bit tedious.
You will probably never need to use this method because Method 1 basically does all of this automatically, but it is in depth and might help give you a better understanding of how things work under the hood.
1. Extract original v4 M2.
Go into Cataclysm's art.MPQ (or oldworld.MPQ for 4.0.1) and extract the original M2 that you want to modify. This M2 should correspond to the same one that is from your v3 mod for WotLK. We just want to get the base v4 M2 which we will use as a basis to to update the v3 mod to v4.
2. Convert the original v4 M2 to v4 M2I.
As you normally would, use M2Mod to convert the original v4 M2 to an M2I. If you're using v4 M2Mod (and you should be), then a v4 M2I will be exported.
3. Import the v3 M2I into Blender.
In Blender, import the v3 M2I from your previous mod for WotLK into an empty layer. Move the imported model out of the way so we can import the v4 M2I on the same layer.
note: It is important that you re-import the v3 and v4 M2Is with the updated v4 import script because some of the imported per-Submesh properties have changed.
4. Import the v4 M2I into Blender.
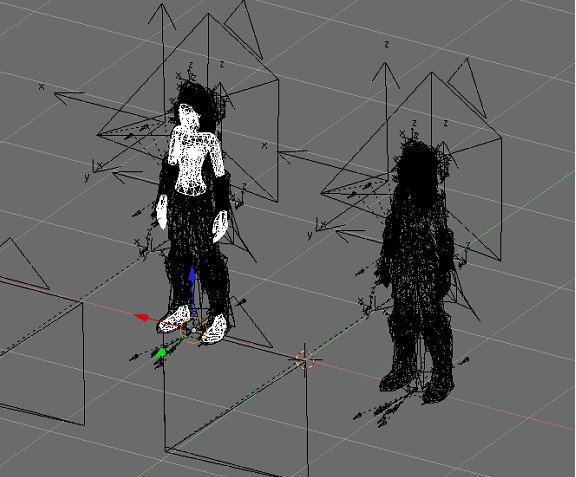
On the same layer, import the v4 M2I which you created in steps 1 and 2. Move it so you get the 2 models side by side because you will be clicking back and forth between them.
You should now have the 2 models side by side like this:

---
For each modified Submesh in the v3 model, there is a set of steps to repeat.
5. Select the modified Submesh in the v3 model.
do it.
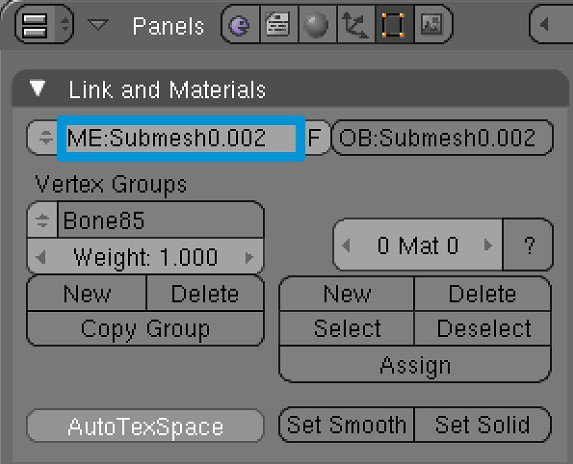
6. Find the mesh datablock name.
Go to the "Editing" buttons (F9) and look at the "Link and Materials" pane. Take a look at the name of the mesh data block that this mesh object is linked to and remember that name.
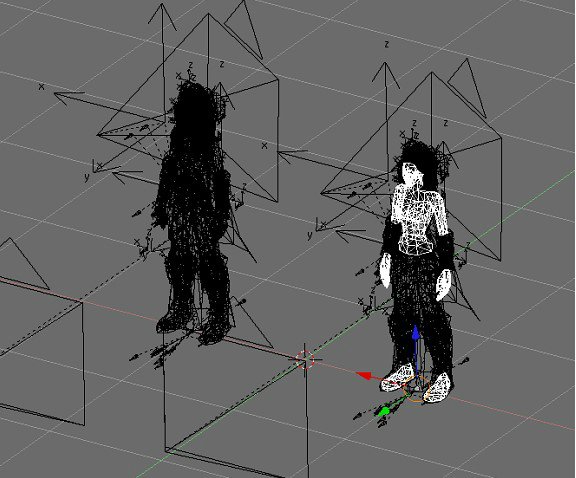
7. Now select the equivalent Submesh in the v4 model.
The equivalent Submesh is the same one that you selected in the v3 model, but in the v4 model.
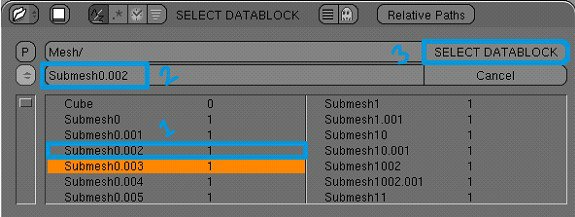
8. Link to the mesh datablock from step 6.
Go back to the "Link and Materials" pane and click on the arrows to change the datablock. Browse to the mesh datablock name you saw in step 6, select it, and then click "SELECT DATABLOCK". The v4 mesh object should now be linked to the modded v3 mesh datablock.


9. Repeat this set of steps (from 5 to

for every modified Submesh in the v3 model.
When you're done, continue to the next step.
---
10. Export the v4 model as an M2I and merge with the orignal v4 M2 to get a modified v4 M2.
This is where things get normal again. Select an object in the v4 Model and go to "File->Export->M2I". Configure M2Mod to load the original v4 M2 and then load the modified v4 M2I and then output a modified v4 M2. Run M2Mod. If everything went well, you should now have a v4 M2 that you can patch and use in game.
Tips:
You don't have to mess with datablock links if you can change the parent/child relationships between mesh and root armature. For example, you can duplicate (shift+D) the body mesh from v3 and child it to the v4 armature (ctrl+P), and then unchild (alt+P) the v4 body mesh from the v4 armature. This has the same effect as datablock linking but takes a few more clicks.
Some v4 models (DraeneiFemale, GnomeFemale, TrollFemale) have had their bone structure or order changed. If you try refit a v3 edit to a v4 armature, the bone weights will be all messed up (you can test this by posing the v4 armature with a v3 mesh). There's no easy way to fix this, but the easiest way is probably to:
1. duplicate your v3 mesh with bad bone weights,
2. delete all it's vertex groups,
3. move it so it's stacked on top of the equivalent v4 mesh (this step might actually be optional, i'm not sure),
4. Optionally, try to rougly reshape the v4 mesh to fit closer to the v3 mesh, this will give better results when performing the Bone Weight Copy.
5. and then shift select the v4 mesh so you have the v3 and v4 meshes selected but the v4 mesh has primary selection,
6. then in the menu of the 3D view go to Object->Scripts->Bone Weight Copy, set Quality to 4 or something, then hit OK.
When it's done, your v3 mesh should have bone weights that match that of the v4 mesh. Try going into pose mode and moving the bones around to see how it deforms. You might have to spend a little more work weight painting or something to get it just right.
You will have to repeat the above steps for every modified mesh you want to bring over from v3 to v4.
A much more tedious method but one that will preserve the weights exactly would involve analyzing the v3 mesh and going through each vertex group by hand and figuring out it's new name in the v4 mesh/armature, and then renaming that vertex group to the new name. I would not recommend this method because it takes a ton of time and work and strained eyes and might not be all that worth it in the end. However, if someone (or myself) was to write a script/program to automate this, it would probably pay off.
This part of tutorial series is not written by me. The author is Redaxle (M2Mod's creator). However, I will improve this tutorial and write more. I hope it will be usefull.

Before you go into more advanced model editing, some basics of blender will help.
View movements:
number pad : pre-set view angles
alt+left click drag : basic rotations
alt+shift+left click drag: panning
alt+ctrl+left click drag up or down: zoom in/out
mouse scroll wheel: zoom in/out
Right click on edge of screen will give option to "split area" to activate multiple view points.
Mesh controlls:
Right click: select mesh group
Tab: Enter/exit mesh edit mode(need to have mesh grp selected)
Left click: Select vertex, face, edge
G: grab and move
R: grab and rotate
S: grab and change size
B: area select. Drag box around area of mesh to select.
Z: toggle wire frame mode
Shift+left click: queue up selection
space bar and W:edit options

