This section allows you to view all posts made by this member. Note that you can only see posts made in areas you currently have access to.
Topics - Skarn
Pages: [1]
1
« on: November 05, 2015, 07:26:05 pm »
Something I have been working on lately.  [attachment=0:3k4ya7x5]Clip2net_151105211428.png[/attachment:3k4ya7x5]
2
« on: April 19, 2015, 12:24:41 pm »
IntroductionI've noticed that a lot of people here are suffering from a client crash bug after using Noggit SDL 1.3 - 1.4 for editing Blizzard ADTs (modifying existing game content). I did not know about this bug when we worked on the new version, so we have not even looked at it yet. And yes, I plan to get back to it when / if we work on noggit again. How to avoid or fix it.The reason for this bug is actually quite simple. Blizzard's editor called WoWEdit does not always fill up all the chunks with all 4 texture layers. There is a mistake in Noggit's code that makes it save grouneffect data to the layer which does not even exist. The easiest solution for the problem is not to work on original game content and create your own custom maps with 4 layered adt templates from Steff's modding pack. However, I doubt that this solution will satisfy everyone because sometimes we do need to change some original maps. In order to make Noggit edit these maps properly you need to prepare the ADTs you edit for saving with Noggit. You simply need to pick up 2-3 textures that does not exist on this ADT, select a huge brush with no pressure and lowest transparency and paint your ADTs until they have all the chunks filled with 4 texture layers. I know that many of you tried doing it but it did not work. Here is another problem. For proper model saving Noggit has to save a bunch of adts around your real edited one. So, every time you fix bugged adt Noggit saves more and more corrupting them. I think that the solution is quite obvious. You just make a listfile (manually) of all the adts you really need + 1 row of adts per each side and remove everything else. Your map should work fine now. Here is a quick example.  P.S. Make this sticky please.
3
« on: March 29, 2015, 02:10:33 pm »
IntroductionHello, Modcraft. Today I am going to show you guys how to make custom non-animated .m2 models out of .mdx (Warcraft III) models. It is believed that converting models using MDXtoM2 is quite a complicated process but actually it is not that hard. You may ask: "Why do we need to do it if we have OBJtoM2 and it works fine?" Well, the answer is simple. This converter provides you a lot more possibilities than OBJtoM2, such as multiple materials, textures, lights, animations and etc. At first, I will show you how to convert static .m2s but I am going to update this tutorial from time to time when I find out something new. Okay let's go. Tools and resourcesThe full conversion will require quite a big bunch of tools which you have to download. 1) MDXtoM2Converter_lazy - a tool that generates .m2 models out of .mdx files. 2) 3DS Max with MDX export plugin or Milkshape. Well, just something to convert your model to .mdx. If you already have your .mdx object, you don't need it. 3) MDLXConverter - a tool that converts .mdx files into .mdl files which are possible to edit manually via Notepad. 4) MDLVis - .mdx/.mdl editor. 5) War3ModelEditor- a tool that allows you to add some additional sections to .mdx, such as lights, bones etc. 6) BLPLab - for converting your textures to .blp (BLP2) file format which is undesrtandable for WoW. (Warcraft textures are BLP1 and cannot be read by WoW). 7) Collision adder - a tool that generates collision in your m2 file.  Resizer.py Resizer.py - a python script that allows you to resize the initial size of your model. 9) PyModelEditor (+Python 2.6 (see PyME thread for details)) to run Resizer.py 10) AddViewDistance for editing the render distance of the model. 11) Sweetscape 010 editor (+ M2 template) - a hex-editor which we are using for fixing bugs in the model. 12) Nullmodel.mdl - .mdl template to make your model understandable for MDLVis. Well, there are plenty of other utilities that can make your model better but they're not essential. The list is quite huge, but don't worry, it won't take that long to get your model into game. Tools which are not linked here are either included into one of the linked packages or can be found in the resource section of Modcraft. Chapter 1. Static modelsStep 1. Preparing your model1. I won't explain you how to make an .mdx model. There are plenty of tutorials on this theme over the internet. At first, your .mdx file does not contain all the information you need for converting it to .m2. In order to fix it you need to convert your .mdx file into .mdl using MDLXConverter. I will call the result model tree.mdl. 2. When it is done you need to open your model in MDLVis. To make MDLVis open your file you have to make the .mdl structure understandalbe for MDLVis. So, pick up Nullmodel.mdl and tree.mdl model and open them in Notepad++. Find a section called Model in your tree.mdl and add missing strings into this section from Nullmodel.mdl. * tree.mdl }
Model "pine" {
BlendTime 150,
MinimumExtent { -261.362000, -252.451996, -88.562103 },
MaximumExtent { 273.287994, 307.015015, 1465.869995 },
BoundsRadius 796.038025,
}
* Nullmodel.mdl }
Model "Sword_2H_Claymore_A_01" {
NumGeosets 1,
NumGeosetAnims 1,
NumBones 1,
BlendTime 150,
}
* Result }
Model "pine" {
NumGeosets 1,
NumGeosetAnims 1,
NumBones 1,
BlendTime 150,
MinimumExtent { -261.362000, -252.451996, -88.562103 },
MaximumExtent { 273.287994, 307.015015, 1465.869995 },
BoundsRadius 796.038025,
} 3. Now go to the end of both files and replace everything starting from "Bone" till the end of the file using data from Nullmodel.mdl. Now you can open your model in MDLVis. 4. Find string Image and write in the path to your textures. This path will be used in your MPQ files. Step 2. Fixing the model in MDLVis1. For some reason MDXToM2 does not create a usual transparancy chunk in the model. In order to resolve this issue open your model in MDLVis, go to Modules>>Sequences>>Skeleton>>Switch back to Anims. Select both geosets (using check boxes) and mark them as visible. 2. Save your model as .mdx  Step 3. Solving possible problems1. In most cases now you can just drag'n'drop your tree.mdx to the converter and it will turn it to m2. Try doing it. If there is a crash open your .mdx in War3ModelEditor, go to Windows>>Node editor>>Right click on the bone>>Add light. Add 4-5 lights and try converting the model with MDXtoM2_lazy. If it does not work, add more lights. Okay, you should get your .m2 model now.  Step 4. Fixing different converter issues1. Open Resizer.py with a Notepad. (should be placed inside a PyModelEditor folder). Edit paths to your model, set the size to 0.02. We need to decrease the scale of your model in 50 times. Save the file. 2. Run it by double clicking. If it works you will see a black command promt window for a second. 3. Open your model in the 010 editor. Run a template on the file. 4. Go to "struct TheFloats floats" and divide each value there by 50. For doing this operation faster open "Hex operations" tab, "Divide". Use the following settings: Treat Data As: Float, Operand: 50, Decimal, and press Okay. Now make sure that BoundingBox size is equal to VertexBox size. If not, copy values from bounding box to vertex bpx. Go to "struct sAnimations _Animations" and make sure if the bounding box values are divided by 50 too.  5. Go to "struct RenderFlags _RenderFlags" and set the blendingmode of every geoset to RM_AlphaTesting (1) (for usual models) and set the Render Flag to the one you need. I used double sided on my leaves geoset to make it visible from both sides. You can find the flag explanation on the WoW Dev Wiki. 6. If you added lights with War3ModelEditor you have to go to "uint Lights", "ofsLights" and set the values to 0. Then go to "struct Lights", select the section and press Shift + Delete on the selected bytes. Step 5. Adding collision1. If you need your collision to be 100% of the size of the model, just drag'n'drop your .m2 on CollisionAdder.exe and you're done. If you need to make some parts of the model non-collideable, you need to create another .m2 model which contains only the geometry you need to keep the collision on. You can even add more geometry if you need to make some invisible collsion walls in your model or smth else. For example, for making tree collision for the second model you leave only bark without leaves. Generate the collision for this model and open both ones in the 010 editor. 1. Copy the values from "uint BoundingTriangles", "uint BoundingVertices" and "uint BoundingNormals" to your model. Go to the end of the file and add 5-6 empty strings containing only zeros.  Pick up the offset of the last empty string and write it to "uint ofsBoundingTriangles". Copy the entire bounding triangles section to the empty space. Finish the string with zeros. Pick up the offset of the new string and do the same for the rest two sections.  You're done. Don't forget to rescale the collision model before doing that using Resizer.py. Chapter 2. Animated modelsI won't explain you how to convert animated models because there already a good tutorial by Phucko1 which should explain you everything you need to know about getting animated models to work. Here it is: http://modcraft.io/viewtopic.php?f=20&t=5536 So, let's think you already have your model converted. However, I am pretty sure that after doing eveything written there most of your model animations will be glitchy. How? This video is the only example I found over the internet, but it looks exactly like this: [media:2egyg736]http://www.youtube.com/watch?v=TUtNSHAPML4[/media:2egyg736] (To the author of this: I just used your video to show how the bug looks like and demonstrate the solution to this problem. I hope you understand it.)
Well, as you can see, some models glitch on some parts of animation. If you reduce the speed of changing frames, you will notice that it looks like the animations start going back at some point. So, it is correct in general, but goes in wrong backwards direction instead of looping. Yeah, that's the mistake of MDXtoM2 converter. I don't know what exactly it is caused by, but I know quite a simple solution for this problem. Step 1. Gethering dataGo to model viewer and open your model. Start playing animations in slow motion mode and make a list of the bugged ones. Now, comes the hardest part. By moving the frames switcher in your WMV you change animation frames. Though, not all of these frames are real. Actual KeyFrames are written to M2, and there are not so much of theme. All other hundreds of frames are just interpolation between them. So, you need to slowly move this switcher and stop it when the animation starts behaving weirdly (most likely goes back or loops where it is not supposed to). Pick up this numbers and add them to your list under your animation. Do it for every animation if necessary.Keep in mind that these frames value are always approximate, and later you will need to find the closest keyframe value. Though, it is not hard as it probably seems to you now. By opening your model in MDLvis (mdx/mdl source model, not m2), you can pickup the bone numbers of the bugged animation parts. Just look in WMV what parts of the body swing badly, find the corresponding bone numbers in MDLVis and add them to the list for each bugged animation. Step 2. Fixing bugsNow open your model in pymodeleditor. Show Node Tree>>Pick up the bone You will now see the Bone Editor. Here you have two buttons: Edit Translation and Edit Rotation. One of them, or both can contain bugged data. Fortunately, it is quite easy to track. When you open either of them, you get the animation KeyFrames cords. For fixing animations, you need to pick up the animation ID of the animation you need to fix in the dropdown menu marked as 4 in the screenshot. Now, speaking about the data itself.  Let's now see what is wrong here. This the original block of data. 0:{ -32759 , -32317 , -32287 , -7 }
1:{ -32758 , -32317 , -32287 , -7 }
105:{ -31914 , 31173 , -31813 , -64 }
243:{ -29948 , 26571 , -31292 , -749 }
313:{ -29284 , 25977 , -31367 , -932 }
382:{ -28844 , 28110 , -31543 , -595 }
521:{ -29063 , -29421 , -32425 , -385 }
590:{ -29558 , -27700 , 32598 , -555 }
694:{ -30218 , -29822 , 32081 , -240 }
868:{ -31503 , 28143 , 31892 , -365 }
973:{ -32071 , 25472 , 32029 , -839 }
1077:{ -32320 , 26522 , 32240 , -609 }
1251:{ -32396 , 31488 , 32626 , -28 }
1424:{ -32577 , -32500 , -32588 , -3 }
1667:{ -32758 , -32317 , -32287 , -7 }
1668:{ -32759 , -32317 , -32287 , -7 }
The number of the each string before ":" is a KeyFrame number. So, the error should be in some numbers close to our previous WMV records. If you look carefully, some values does not follow the common pattern in the middle of the structure. The errors can be only related to negative/positive value differences. You never need to change the numbers. In most cases you mostly need to remove some minuses in from of the first value. But I picked up the hardest example I could find for you here. :twisted: 521:{ -29063 , -29421 , -32425 , -385 }
590:{ -29558 , -27700 , 32598 , -555 }
694:{ -30218 , -29822 , 32081 , -240 }
These 3 keyframes look weird for me. And they suprisingly almost exactly match my WMV aniamtion bug records. Let's see why. Keep a look at the second coloumn. These 3 values are negative while everything around them is positive. Here our animation is most likely to go backwards. Let's change them to positive. 0:{ -32759 , -32317 , -32287 , -7 }
1:{ -32758 , -32317 , -32287 , -7 }
105:{ -31914 , 31173 , -31813 , -64 }
243:{ -29948 , 26571 , -31292 , -749 }
313:{ -29284 , 25977 , -31367 , -932 }
382:{ -28844 , 28110 , -31543 , -595 }
521:{ -29063 , 29421 , -32425 , -385 }
590:{ -29558 , 27700 , 32598 , -555 }
694:{ -30218 , 29822 , 32081 , -240 }
868:{ -31503 , 28143 , 31892 , -365 }
973:{ -32071 , 25472 , 32029 , -839 }
1077:{ -32320 , 26522 , 32240 , -609 }
1251:{ -32396 , 31488 , 32626 , -28 }
1424:{ -32577 , -32500 , -32588 , -3 }
1667:{ -32758 , -32317 , -32287 , -7 }
1668:{ -32759 , -32317 , -32287 , -7 }
And it works like that for Translations and Rotations. Just save your files more often to avoid erros and make backups. It takes approximately and hour for every model. But I am pretty sure if you do it often, you will get a faster skill. That's all for now. Big thanks to Vel, Malice and other people who helped me and to the authors of all these tools I used here. I will add some pictures soon enough to make this tutorial more understandable for newbies. If you don't undestand something (my English sucks) or have some problems/tips feel free to ask me. Check this thread from time to time for getting recent updates. Good luck with your first model  .
4
« on: March 19, 2015, 05:30:18 pm »
I noticed that some attachments are gone from the forum. So, some tools are now obviously gone as most of them are not hosted externally, or the links are expired. Please, have a look at the problem.
5
« on: January 30, 2015, 07:54:12 pm »
 Noggit SDL 1.4 (beta)Hello, Modcraft community. Today I am going to release a beta version of Noggit SDL 1.4. I hope that you will like the results of our work because now there are some new features you have been waiting for quite a long time. First of all, I want to say thanks to AxelSheva who coded almost all the changes on his own with me just searching stuff, helping around and testing. And a special thanks to Cromon, Schlumpf and some other people here and there who were helping us, and to axel009, Drikish (Eversio team), tehrob, Allifeur, Kranimal and other guys who got an early access to test the version. Amaroth: I have uploaded my Noggit for you guys on Dropbox. https://www.dropbox.com/s/2eyuyzedvvlpxpt/NoggitSDL1.4.rar?dl=0 :arrow: The archive contains everything you need to run Noggit. So, just setup a config file properly (you can take the one from your older Noggit version. :!: This is still a BETA version which was not properly tested. I don't recommend you to use it on your works because it might ruin them. If you're using it not for testing purposes, no one is responsible for the safety of your data. However, I hope it won't happen. Open sourcehttps://github.com/axelsheva/noggitBitbucket update is coming soon. BugtrackerWe have a bugtracker on Modcraft. You can access it from the top menu of the page. Feel free to make bug reports if you find something, but please write in your Noggit version. I don't want to search for the solutions of the already fixed bugs Changelog==Fixed bugs==o Model duplication - feel free to save as much times as you want (requires testing). o Chunk cracks (terrain fault, chunk gaps) - the reason that causes this bug is not fixed, but if you have them you can run "Fix gaps" or "Fix gaps (all adts)" functions from the Assist menu. It will remove all the cracks from the ADT(s). o 2D mode painting - now you have to press Shift to paint textures in 2D mode, so you won't have anything occasionally painted while touching the UI. o We have also fixed a lot of warnings in the code, so it is much cleaner now. ==New features==o Water chunk-by-chunk editor - when you are in the water editing mode you can add water with Shift + Lmouse and remove it with Ctrl + Lmouse. To select some chunks you need you can press Alt + Lmouse, and Alt + Ctrl + Lmouse to deselect them. It is possible to change the height of the selected chunks, fill the selection with water. If nothing is selected, you will move the water on the entire ADT. There is also a water crop function that removes all the useless water under the terrain, so that fishing can work properly on your custom maps now. By the way, Noggit crops the water absoultely identically to the way Blizzard does it, so it's a blizzlike feature for sure. o Vertex shader painter (alpha) - there is a new editing mode that allows you to paint vertex shaders on the terrain. I doubt that it works how it is supposed to do, so we are still working on this feature. o The toolbar rework - now we have a new toolbar that is aligned to the left side of your screen and does not cover half of your precious rendering space on small screen resolutions. (It used to be a huge problem for me as I work on a laptop  ) There are still so much work to do, and we are not giving up yet. I hope that you enjoy working with this Noggit version. Have a nice worldbuilding time! Don't forget to request new features and report bugs. Skype conversation for Noggit testing. Feel free to joinskype:?chat&blob=INWBuLRkZJwxa3rj6zFQmk7E78QLZtRTg6NzaWMK4PZoAQ4gp03Dl-1Zi4lVGvMVMvz_eaBlx8c7Jd2Ompg (send this to someone and then click on the link) ~Skarn (skype - live:skarnproject)
6
« on: March 23, 2014, 09:56:30 pm »
Hi there everyone, just wanted to show you some more of our progress with Skarn, hope you enjoy. This is Part 1 of our progress more coming soon! I will update this thread with annotations, explaining what certain things are as i currently don't have time ATM. Please also note that we are only showing certain parts of zones, not all images show completed work and most are concept examples. We are recruiting please check the recruitment thread! Take Care and Enjoy Love Drikish (Co-Owner of Skarn) ------------------------------------------------------- New World Map  ----------------------------------------------- I will be showing canyons here from previous Topic, the new stuff is below!   [youtube:1p14sbq0]http://www.youtube.com/watch?v=2L0FQrRhjBM[/youtube:1p14sbq0]                     ------------------------------------------------------------ Thor'zain Pass - Raiding Environment           --------------------------------------------------------------------------------------------- Gehenna - Starting area for the Fallen (Satyr) The Basic Lore : General: The Fallen are an evil, demonic race, re-forged from the bodies of fallen heroes in Demalyr (Deh maul yur). With the power of the Fire of Saimon, life is able to return to the body, but we a single, corrupt intent...to kill all. With the recent attack on [world's name], the Fallen have grown much weaker due to their failed attempt. Seeing this as an opportunity, the living called upon the power of the [ancients, creators, titans, etc] to strike down the Fallen once and for all. However, they underestimated to power of King Saimon, the leader of the fallen. He has now appointed a select few of the Fallen (the player) to scout out the world above for a final invasion, while he stays to fend off attackers. They now have a simple mission: To destroy life entirely...but not without wrecking havoc first. Origin: The Fallen came to be thousands of years ago , when only humans existed on [world's name].They were created by King Saimon, who was trying to achieve immortality. What he found was immortality in its only form-death. He was tortured for days by demons never heard of, and imbued with terrible hatred, despair and power. As he spoke his last words, he cursed those who he hated to die a terrible death, much like himself. When he died, he was dragged through the ground, and his soul was torn apart and corrupted. Every bit of his remains were absorbed by those he cursed, which killed them all. They were summoned by the now-cursed King Saimon, who now ruled over Demalyr. King Saimon’s power is held within the fires of Demalyr. With all his emotions and destruction in the fire, it is capable of returning life to the dead, thus creating more Fallen. The only way to destroy Saimon is to extinguish the fires of Demalyr, which I said to release all his corruption into the world. No one knows what will happen then... (Powers, in this case): The Fallen are capable of massive destruction. Their power is fed by the anger and despair of others. They worship no one, except a little honor towards Jethax Harabat, and a bit rogue like. However, they must no work together in order to sustain Demalyr. Appearance: The Fallen look almost identical to as they did when they were living, with the exception of their bodies being corrupted by the Fire of Saimon. While they look similiar to as they did when alive, the have no knowledge of their previous life at all. All memory has been replaced with the desire to kill the living. ------------------------------------------------- THIS ZONE HAS NOT BEEN FULLY TEXTURED -------------------------------------------------- Fallen Models - only a few here...         ----------------------------------------------- Gehenna Zone -  World Boss  --------------------------------------------------             High Definition Fully Custom Textures on world objects   ------------------------------------------------------ The Drow Prison Raid/Instance          -------------------------------------------------- Orc Starting Zone Preview     --------------------------------------------------- The Human Kingdom    --------------------------------------------------- Skarn - GM External/Internal Custom Console Information - WoWGM.exe activates the GM console in your WoW.exe and allows you to acces most debug and graphic functions. Short list of feaures: 1. Rendering normals what is very usefull while m2 or wmo development. 2. Wireframe mode 3. Gamespeed control 4. Time control 5. Pathfinding rendering 6. Hide/show m2s, WMOs, Character models, Footprints, WMO and M2 textures, Water, 3D/2D shadows, particles, lights, WMO portals, terrain, fog, groundeffects, screenglow etc. 7. Most GM commands also work in the console. 8. Changing farclip, nearclip and other graphical settings. It’s not the full list of functions. I named only the working and finished ones. WoWGM.exe was made by our programmer Tristan.    
7
« on: March 23, 2014, 04:07:14 pm »
Hello, Modcraft. Today I was planning the way I will build a city for my project. It's obvious that you need some custom models to build something really impressive and not wow-like. However, it's really hard to make a lot of custom models which are necessary for a city. So, I decided to mix them with some original stuff. A lot of people asked me if it's possible to use parts of WMOs in their worldbuilds. Here you can see the result of my work. All the models work fine in the game without any collision or graphical problems. Big thanks to Gamh for his awesome MirrorMachine. It would be impossible to make this without it. I also don't see any reason for keeping these models private because they're not made by me actually. So, I will release a big package soon when I'm done with the whole Stormwind. The release will contain towers, gates, ladders, houses, walls and everything that is possible to detach. Furthermore, I am not going to stop on Stormwind. There are also a lot of models that I would like to cut into pieces. :twisted: So, you just have to wait for the release. Please tell me your opinion about such things. You can also ask me to detach some models for you in the comments below. Happy wow modding, everyone.         
8
« on: February 23, 2014, 09:57:03 am »
9
« on: February 22, 2014, 08:55:02 pm »
IntroductionWelcome to Skarn. Skarn is a project where we are building a brand new world, based on the World of Warcraft game engine. We’re building the world by hand, and it’s accompanied with new races, classes, zones, dungeons, quests and more. Our world has a unique storyline developed from scratch by our team, it’s not related to Warcraft universe at all. Skarn is an open project, where everyone can join and contribute to different parts of it such as worldbuilding, server development, quest designing or lorewriting.Right now we are under a severe development and are looking for new contributors. If you’re not skilled enough or don’t suit our requirements, but you would like to participate in the development process, please contact us. We will see what we can do. However, you should have enough amount of time and a will to learn the modding basics. Don’t hesitate to ask if you’re interested in joining Skarn. You should also remember that Skarn is a legitimate and serious project, in which only passionate and dedicated people will be accepted during the recruitement process - unlike most expansion ideas. Skarn, will continue progress and is extremely strong in its design and its members. Therefore we can guarentee this project will not fail, will not "drop/collapse" or have any major issues. The project will take a long time to complete, but we have do have a solid structure and therefore the more people we have the faster it will take off. We understand that it's really hard to make a fully custom world. That is why, we have plans of transfering our project with all the existing content into "a fan-made expansion for WoW" if something goes wrong with our current idea. However, I hope it will never happen You can see that our thread doesn't have any screenshots or videos at the moment. We already have some content but we don't like the idea of posting WIPs. So, you have to wait a bit to see some pictures or videos. It won't take very long, so check this thread from time to time. Some lore and concept information will also come later. Ancient Canyons Zone screenshots - http://modcraft.io/viewtopic.php?f=37&t=7477I would also mention that we want to bring back large high quality modding and expand the modding process and that we are happy to help train a certain amount of people if we think they will be good enough in the future. We also want to say "thanks" to all the developers on modcraft who are developing or developed any wow modding tools or posted some tutorials. Without you this project wouldn't be strarted. We're really glad to be a part of this board. We're going to use modcraft forums as a base for all our activity. So, we're asking for providing us with a featured forum like it's done with Maruum project. Thanks. Best regards, Skarn project team. Contact usPrivately on Modcraft E-mail: skarnproject@gmail.comWe are recruitingLevel DesignerRequirements: Basic understanding of Noggit, and associated tools. An idea of spawning models, and where they belong. Plusses: Have a project or some screenshots of your work to show. Understanding of additional level design technologies such as alphamapping and light editing. Server DeveloperRequirements: Fluent knowledge of C++, Lua or SQL. Experience with World of Warcraft Emulation Complete knowledge of MySQL software WebdesignerRequirements: Flexible webdesign knowledge Great skills using Photoshop or similar software Plusses: A running website to show off. Quest DesignerRequirements: Knowledge of how quests are designed. Apropriate writing and grammar skills. An ability to remember all aspects of our lore. Plusses: Experience in writing stories Experience in quest design Basic C++ knowledge Dungeon DesignerRequirements: Advanced knowledge of Noggit SDL usage. Experience in working in different 3D editors such as Maya, 3DS Max, Blender or MDLvis. Understanding the Texture Flow of WoW. Plusses: Some models to show. Basic understanding of WoW model convertation. Basic hex-editing knowledge. Class & Race & Spell designerRequirements: Knowledge of DBC file editing. Knowledge of SQL programming. Plusses: Experience in class/race or spell designing. MPQ-Patch developerRequirements: Knowledge of the MPQ system in WoW. An ability to keep huge amount of files in order. Plusses: Developer of MPQ software. Samples to provide. Community DeveloperRequirements: Experience as moderator on well-used forums. Fluent English or Russian. Well-written communicational skills. Plusses: Knowledge of Multible languages, especially German,Spanish or Russian. 3D Model ArtistRequirements: Knowledge using 3DS, Maya, blender, or other great 3D manipulation Software. Understanding the flow of World of Warcraft 3D models. Plusses: Have a final product to show. Knowledge of using Blender with M2Mod plugins. Lore writerRequirements: Experience in fantasy storywriting Advanced language skills Time to read the lore others wrote. Plusses: Some stories to show off Voice actorWe are looking for X individuals who have experience with varied vocalization, accents, voices and sound modification software. You must be able to give an example of your work, be able to meet neccesary demands, own decent quality equipment and be able to adapt to new concepts/ideas. You must be passionate, dedicated and not shy. We welcome anyone to try out for this post. Plusses: More thrilling gameplay Big thanks to Elinora. We used her recruitment thread as an example for ours.
10
« on: February 15, 2014, 01:31:55 pm »
 Introduction This tool will allow you to make model edits to World of Warcraft's M2 files. Example:  DownloadsBlender 2.62 Windows x32Blender 2.62 Windows x64Blender 2.62 Mac OS XBlender 2.62 LinuxM2Mod4 ( Mirror) M2Mod3 (3.3.5a) It works around M2I files. M2I stands for M2 Intermediate, and is a file format that was developed for this tool, and contains only the data relevant to that which we want to edit, which is meshes, bones, attachments, and cameras. The core steps to making a mod are:Convert the M2 to an M2I.  Import the M2I into Blender. Make edits. Export the M2I from Blender. Merge the original M2 with the modified M2I to produce the final modded M2. If you don't use Blender, you'll have to write your own import/export scripts for the M2I files. Included with the main package is documentation on the M2I file format so you can do this. You may edit meshes however you want. You can edit vertex weights, vertices, UVs, subdivide, split, extrude, sculpt, etc. Just about anything that Blender will let you do to the mesh you can do safely without worrying about breaking the model. As long as you export a triangulated mesh, the tool can take care of the rest. You can even edit bone positions, attachment positions, and cameras. Under the hood, M2Mod rebuilds the skin files from scratch, and this lets you edit the mesh however you want with few limitations. special thanks to Trollpaxton who shared the source code for his M2 mod tool which served as a great reference point for this tool, especially with fixing animation offsets. special thanks to the wowdev and source peek wikis and whoever edits those pages with the reverse engineered file format information needed to make something like this possible. thanks to everybody on Darknest who makes mods. thanks to everybody on Darknest who uses mods. Common Questions and TipsQ. What is an M2 file? A. An M2 file is the 3D model file format created by Blizzard and used by WoW. It has gone through several revisions over each release of a new WoW expansion. This current version of M2Mod is made to work with Cataclysm version M2s, which happen to be the same version as those used in Pandaria (for the most part anyway). Q. What is an M2I file? A. An M2I file is an intermediate and slimmed down format for making edits to M2 files. It makes importing and exporting from 3D software easy because it doesn't have all the extra data that has no place to belong within Blender. Q. How come I can't use M2Mod with the Pandas? A. This race is not supported yet. Q. What version of Blender should I used with M2Mod? A. Currently M2Mod only works with Blender 2.62, I've been too busy to bother with keeping the M2I import/export scripts up to date. Q. How do I extract original M2 files? A. It is possible to extract original M2 files from model.MPQ, but if Blizzard has released an update that patches those M2 files then that patch data will be stored in one or more of the the wow-update-base-x.MPQs. So to extract a fully patched and up-to-date M2 (which you should always do before you start editing, because only the up-to-date M2s will have new animations and what not): 1. Grab Ladik's MPQ Editor. 2. Run it. 3. Go to File->Open MPQ(s) With Options ... [Ctrl+Shift+O]. 4. Browse to WoW's data folder (might be at C:Program Files (x86)World of WarcraftData) and multi-select model.MPQ and all of the wow-update-base-x.MPQ files (but don't select any custom user-made MPQs you might have). 5. Hit Open. 6. Another window will show up, and select Patched mode (and optionally check Read-only mode) and then hit OK. Now you can just drag and drop the files from the MPQ onto your computer somwhere Q. How do I use the M2I import/export scripts with Blender? A. 1. To install the scripts, copy the included "scripts" folder to: %appdata%BlenderFoundataionBlender2.62 (or you can copy them to Blender's install folder as well) 2. Once they are there, they will have to be enabled from within Blender, so open up Blender and go to: File->User Preferences and then go to the Addons tab and then enable Import-Export: Export: M2 Intermediate (.m2i) and Import-Export: Import: M2 Intermediate (.m2i) Then click Save As Default so the scripts will always be enabled whenever you open Blender Now you should be to import and export M2Is from File->Import->M2 Intermediate (.m2i) and File->Export->M2 Intermediate (.m2i) Tip: Always treat M2 files and their SKIN files like a single file. If you copy or move an M2 between folders or MPQs, always bring it's SKIN files along with it; an M2 won't work without them. Tip: M2I is designed and tested to work only with character M2s. It may or may not work with other kinds of M2s used for items or environments or doodads etc. Tip: A working knowledge of using Blender and making 3D models is required. I can't teach you how to use Blender. Take the initiative to teach it to yourself How to update v3 WotLK model edits to v4 Cataand how to update models when a minor patch comes outThis is a guide for model editors who want to update their old model edits that they made for WotLK to Cata. In this document, I use the terms v3 to refer to WotLK and v4 to refer to Cata. The M2 and M2I formats have been change with the transition from v3 to v4. M2I's made with the last version of M2Mod will be called v3 M2I's, whereas the current version of M2Mod makes v4 M2I's. Also, v3 M2's refers to the last version of M2 pre-patch 4.0, and v4 M2's are the current version. Remember that any time and M2 file is mentioned, it really means the M2 file plus it's SKINs files. These files should always be treated as one. So when you extract an M2 from an MPQ, always also extract the SKIN's along with it. Method 1This method will probably work in most all cases. It involves just using M2Mod to merge a new original v4 M2 (from art.MPQ) with the modified v3 M2I (or v4 M2I) (from your existing mod project) as you normally would, and then you will get a modified v4 M2 that you can put into a patch. When using this method, make sure that IgnoreExtras is enabled and IgnoreMaterials is enabled, this will ensure that all the parts other than geometry gets updated to v4. IgnoreMaterials is bugged on some models, in which case you might have to remake your edit using Method 2. Method 2If the first method doesn't work or problems arise when you get your modified M2 into the game, then it is probably because there were some changes made to the model from WotLK to Cata (such as bones or attachments were added or removed). This method will let you work around those deeper changes, but it involves a bit more work in Blender. It's a bit tedious. You will probably never need to use this method because Method 1 basically does all of this automatically, but it is in depth and might help give you a better understanding of how things work under the hood. 1. Extract original v4 M2. Go into Cataclysm's art.MPQ (or oldworld.MPQ for 4.0.1) and extract the original M2 that you want to modify. This M2 should correspond to the same one that is from your v3 mod for WotLK. We just want to get the base v4 M2 which we will use as a basis to to update the v3 mod to v4. 2. Convert the original v4 M2 to v4 M2I. As you normally would, use M2Mod to convert the original v4 M2 to an M2I. If you're using v4 M2Mod (and you should be), then a v4 M2I will be exported. 3. Import the v3 M2I into Blender. In Blender, import the v3 M2I from your previous mod for WotLK into an empty layer. Move the imported model out of the way so we can import the v4 M2I on the same layer. note: It is important that you re-import the v3 and v4 M2Is with the updated v4 import script because some of the imported per-Submesh properties have changed. 4. Import the v4 M2I into Blender. On the same layer, import the v4 M2I which you created in steps 1 and 2. Move it so you get the 2 models side by side because you will be clicking back and forth between them. You should now have the 2 models side by side like this:  --- For each modified Submesh in the v3 model, there is a set of steps to repeat. 5. Select the modified Submesh in the v3 model. do it. 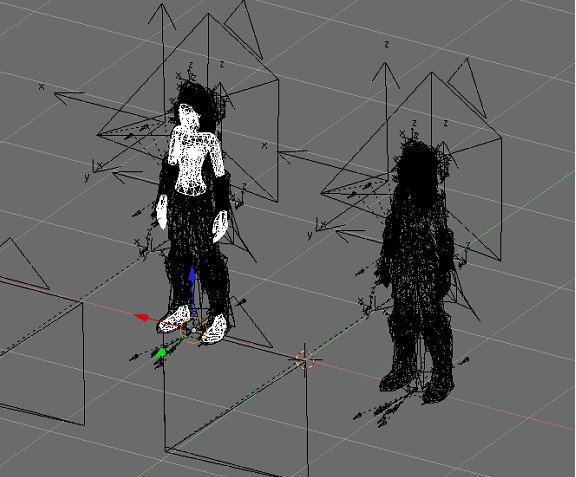 6. Find the mesh datablock name. Go to the "Editing" buttons (F9) and look at the "Link and Materials" pane. Take a look at the name of the mesh data block that this mesh object is linked to and remember that name. 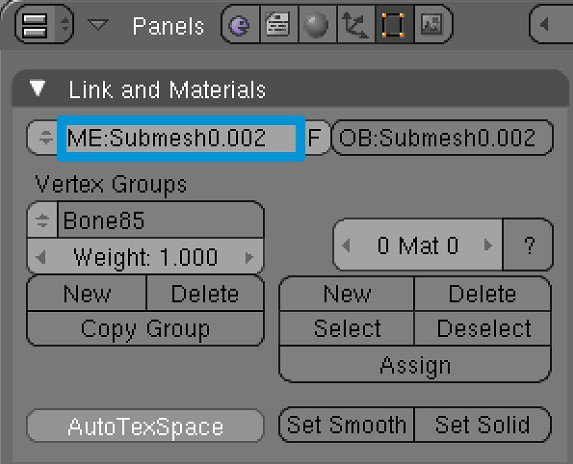 7. Now select the equivalent Submesh in the v4 model. The equivalent Submesh is the same one that you selected in the v3 model, but in the v4 model. 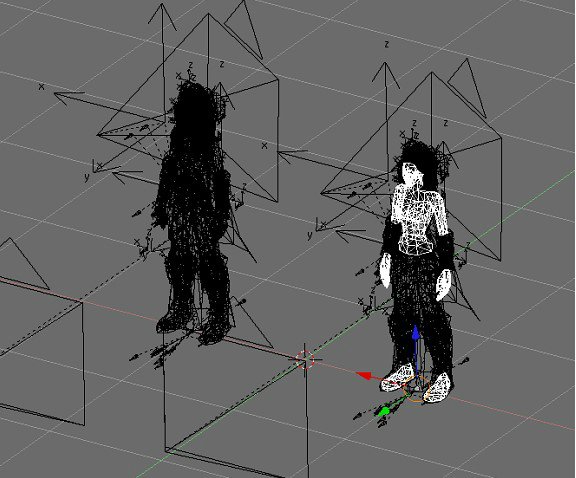 8. Link to the mesh datablock from step 6. Go back to the "Link and Materials" pane and click on the arrows to change the datablock. Browse to the mesh datablock name you saw in step 6, select it, and then click "SELECT DATABLOCK". The v4 mesh object should now be linked to the modded v3 mesh datablock.  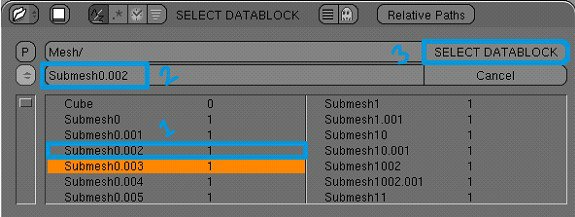  9. Repeat this set of steps (from 5 to for every modified Submesh in the v3 model. When you're done, continue to the next step. --- 10. Export the v4 model as an M2I and merge with the orignal v4 M2 to get a modified v4 M2. This is where things get normal again. Select an object in the v4 Model and go to "File->Export->M2I". Configure M2Mod to load the original v4 M2 and then load the modified v4 M2I and then output a modified v4 M2. Run M2Mod. If everything went well, you should now have a v4 M2 that you can patch and use in game. Tips: You don't have to mess with datablock links if you can change the parent/child relationships between mesh and root armature. For example, you can duplicate (shift+D) the body mesh from v3 and child it to the v4 armature (ctrl+P), and then unchild (alt+P) the v4 body mesh from the v4 armature. This has the same effect as datablock linking but takes a few more clicks. Some v4 models (DraeneiFemale, GnomeFemale, TrollFemale) have had their bone structure or order changed. If you try refit a v3 edit to a v4 armature, the bone weights will be all messed up (you can test this by posing the v4 armature with a v3 mesh). There's no easy way to fix this, but the easiest way is probably to: 1. duplicate your v3 mesh with bad bone weights, 2. delete all it's vertex groups, 3. move it so it's stacked on top of the equivalent v4 mesh (this step might actually be optional, i'm not sure), 4. Optionally, try to rougly reshape the v4 mesh to fit closer to the v3 mesh, this will give better results when performing the Bone Weight Copy. 5. and then shift select the v4 mesh so you have the v3 and v4 meshes selected but the v4 mesh has primary selection, 6. then in the menu of the 3D view go to Object->Scripts->Bone Weight Copy, set Quality to 4 or something, then hit OK. When it's done, your v3 mesh should have bone weights that match that of the v4 mesh. Try going into pose mode and moving the bones around to see how it deforms. You might have to spend a little more work weight painting or something to get it just right. You will have to repeat the above steps for every modified mesh you want to bring over from v3 to v4. A much more tedious method but one that will preserve the weights exactly would involve analyzing the v3 mesh and going through each vertex group by hand and figuring out it's new name in the v4 mesh/armature, and then renaming that vertex group to the new name. I would not recommend this method because it takes a ton of time and work and strained eyes and might not be all that worth it in the end. However, if someone (or myself) was to write a script/program to automate this, it would probably pay off. This part of tutorial series is not written by me. The author is Redaxle (M2Mod's creator). However, I will improve this tutorial and write more. I hope it will be usefull. Before you go into more advanced model editing, some basics of blender will help.View movements: number pad : pre-set view angles alt+left click drag : basic rotations alt+shift+left click drag: panning alt+ctrl+left click drag up or down: zoom in/out mouse scroll wheel: zoom in/out Right click on edge of screen will give option to "split area" to activate multiple view points. Mesh controlls:Right click: select mesh group Tab: Enter/exit mesh edit mode(need to have mesh grp selected) Left click: Select vertex, face, edge G: grab and move R: grab and rotate S: grab and change size B: area select. Drag box around area of mesh to select. Z: toggle wire frame mode Shift+left click: queue up selection space bar and W:edit options
12
« on: February 15, 2014, 10:10:54 am »
Hello, everyone. I want to create custom flying camera for my custom races and their starting zones. Does anybody know is it possible? I've heard that there's a tool written by Schlumpf or somebody else, but I don't know where I can find it.
Regards, Skarn.
Pages: [1]
|