This is a read only copy without any forum functionality of the old Modcraft forum.
If there is anything that you would like to have removed, message me on Discord via Kaev#5208.
Big thanks to Alastor for making this copy!

Show Posts

This section allows you to view all posts made by this member. Note that you can only see posts made in areas you currently have access to.


Topics - Steff

Pages: 1 ... 3 4 [5] 6 7 ... 12
61
General / [NUT] Custom Ship and fly routes on custom maps
« on: March 15, 2013, 02:17:40 pm »
First NUT will be shiproutes and fly routes.
Not the griffon routes the Zellelin once ;)
Have you informations?
It should get all collected for Trinity and Arcemu?

62
Workboard / XX - MPQs in depth
« on: February 26, 2013, 01:12:19 pm »
What they are

how wow they load

How you must creat them to work properly

Devide work to get clean structures.

63
Workboard / 16 - Setup music and atmo for areas
« on: February 25, 2013, 12:50:30 am »
Music and atmo

64
Getting started the WoTtLK tutorial / FEEDBACK
« on: February 18, 2013, 12:12:29 pm »
It would be cole if you guys give me some feedback here in this thread about the tutorial and also if you use them the translations. Do they help you, can you good and easy follow, do you understand all the points?

I want to make this as good as possible so I need you informations!

65
Development and Presentation / Genesis community editor
« on: February 13, 2013, 01:16:39 pm »
I want here document my work on the genesis community editor.
It will be a webbased editor for databese stuff. The MySQL once for trinity and the DBCs aswell.

I code it for Maruum that also people with less tech skills can create content without the need to acces the DBs direct or have special rights on the server.

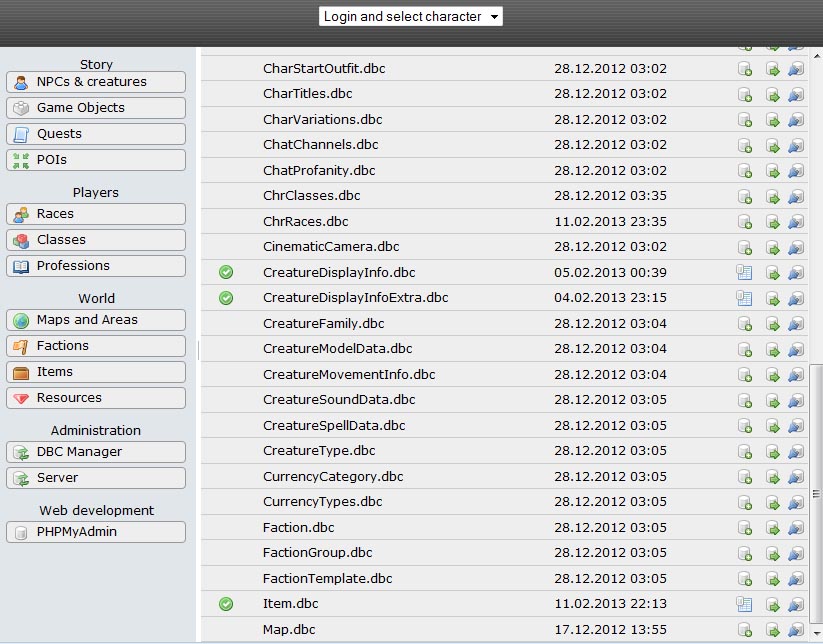
First I implemented a DBC Manager to import and export DBC files into MySQL tables. This way the editor can acces both data sources with one way. Also because the DBCs are then located in a real database its transaction save and much faster.

The design will change during development I think :)


http://imagr.eu/up/511b8287e52335_DBCEditor.jpg

In this part you can create the definition files that descripe the DBCs that get used to import and export. Also relations get placed there in future. The green marked tables are still included and can get exported again.

Now a main concept of the editor will be that every data you create get documented in a relations DB. So if you creat a NPC only you and the admins can access it.

Also you have a list of your NPCs only what give you much more clearness in UI. You will be able to search all NPCs in future and ask for acces this to place own story on them.


http://imagr.eu/up/511b8333003f61_NPC.jpg

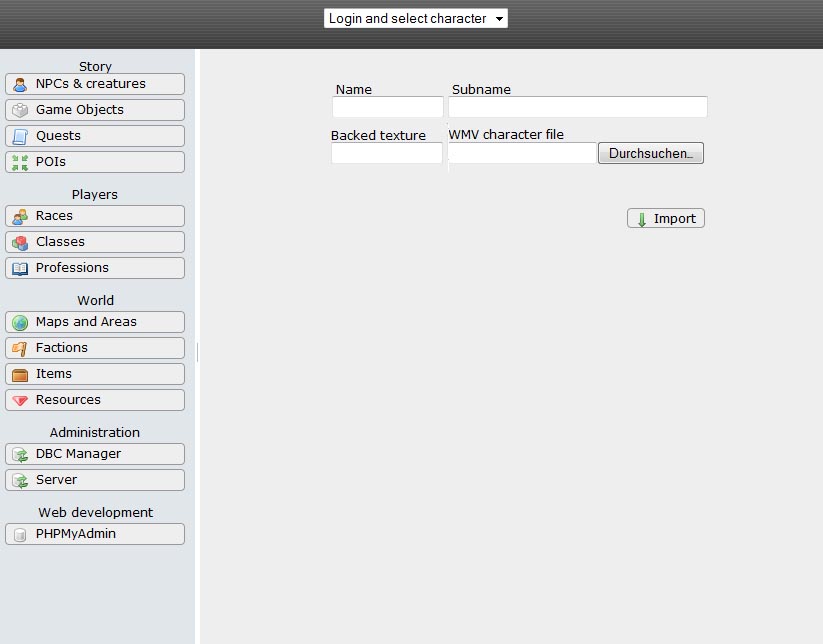
The last thing I finished is a custom NPC importer. It use the ModelViewer .chr files to create all the Database entrys from. So you can create a NPC in ModelViewer, save the .chr and the backed texture and just import it by give the npc a name. All the other values you can later change in the NPC editor. Like health, level or class.


http://imagr.eu/up/511b838c38b911_NPCImport.jpg

Next will be the quest and gossip editor.

66
Noggit / Noggit and windows 8
« on: February 06, 2013, 09:04:53 pm »
As some asked. Noggit run without problems. I tested it on a new notebook of a coworker.
Had no problems after installed the tutorial pack.

67
Serverside Modding / Trinity core gossip
« on: February 03, 2013, 03:45:28 am »
Is there a only DB driven way to creat NPC gossip. I want to integrate chats like in offline RPGs (Skyrim) where you find out more about the world.And for this I want to integrate an gossip editor into my genesis editor.

68
Workboard / 14 - How to setup light\skybox on your map
« on: January 21, 2013, 10:19:14 am »
based on "lightning yard spheres" from "help models" in the Noggit section.
1) create a sphere....
2) rescale it...
3) check the name. for example Sphere600yards
4) check the scale in noggit, for example 3.48
5) 600 x 3.48 =2.088
6) 2.088 x 36 = 75.168 This is original sphere radius
7) check the client XYZ of the sphere then X36 = ... original XYZ
8) add all this to light.dbc
9) add light.dbc into MPQ
10) profit!
11) Delete sphere from map
~ (a brief example)

Thansk to Velfor this tip.

69
Showoff - what you are working on / Wide Lakes - The Falls
« on: January 15, 2013, 12:44:54 pm »
I work in the moment on the well for the wide lakes. Its a big lake in the mountains.
From there many waterfalls run down the hills and feed the lakes.

Before I take tons of time more to expand this thing, I want to ask what you think.


http://imagr.eu/up/50f53f268cfca3_WoWSc ... 123349.jpg


http://imagr.eu/up/50f53f42ebd695_WoWSc ... 123324.jpg


http://imagr.eu/up/50f53f51e837e7_WoWSc ... 123308.jpg

70
Random / Showme your first edits
« on: December 15, 2012, 08:38:44 am »
What and when you did your first work:)
Just for fun.


And here :) my first texture swap in 25.12:2008... The flag ;)


And then on 29 my first land grow on Azeroth. I created an island for an own questline in the sea of westfall.


71
Workboard / What points to add.
« on: December 08, 2012, 01:36:36 am »
What do you think is missing?
Suggestions?  :)

72
Workboard / 14 - Area ID
« on: December 08, 2012, 01:15:21 am »
Area ID setup

73
Getting started the WoTtLK tutorial / 08 - Holes and Impassable tools
« on: December 08, 2012, 01:13:05 am »

This part just introduces you to the 2 tools Holes and Impassible.
There is not much to learn about them. Only that they exist and for what they are

:)

Holes


Holes are needed if your player should be able to get under the ground. You need it for caves or buildings.


Also you can create partly groundless maps with this tool.


>> Select the holes tool, its the icon with the glowing tube or press 4.
>> CTRL + left click open a hole.
>> SHIFT + left click close it again

Quote
Holes are set on subchunks. That are the blue squares you only see if you have lines turned on (F7) and holes tool selected.

Impassable


You can activate the option so that the player can't pass chunks. It's like an invisible wall.
You can use this to prevent the players from entering regions you don't want them to enter or just create a barrage in the sea.

>> Select the Impassable tool, it's the last icon with the spiderweb on it or press 6
>> SHIFT + left click turns it on
>> CTRL + left click turns it off again

Activated chunks are marked white.


This guide has been completely proof-read and corrected in grammar by Mountainlion. Feel free to message him.


09 - Water script in deepth

74
Getting started the WoTtLK tutorial / 13 - Ground effects
« on: December 08, 2012, 01:11:03 am »

Description


Groundeffects are auto placed doodad sets that fill the ground. You don´t have to place hundereds or thousands of models, just create a new set and add it to the texture you like to.

Quote
There is a special data array for this inside the Maptile (ADT) file that defines what texture in a special square part of the ground is used for groundeffects source. Noggit SDL doesn´t write these informations in the moment, so you need to update them with Mjollnas CMD tool after every texture change. This tool looks up what the most common texture located on every square (subchunks) is and saves the texture id from 0 to 4 into this data array.

Create a new set


A set is always build out of 4 different models. You can browse the detail models that get used for this in the following path inside your ModelViewer. Or just search detail.

World/Nodxt/detail

Firs step is to search 4 nice models fitting to each other and your environment. Lets take the next 4 for our test. Dont be to critic here because you will only see ingame if they fit with the texturing and the other models. Some mixtures that you think they will never fit work fine ingame. And others don´t <!-- s:) -->:)<!-- s:) -->

  • apkgra02.m2
  • arhflo02.m2
  • atcgra02.m2
  • csclov01.m2

Next we need to search the model IDs or even, it they are missing in the GroundEffectDoodad.dbc, we must add them.

>> Open Tools/MyDbcEditor
>>Open GroundEffectDoodad.dbc
>> Search apkgra02
>> If its included write down the number.
>> If its not included right click on an existing line
>> Select copy line to
>> Change the name in the new existing line to yours
>> Then write downthe number

Set the third columm to 0 if you add new. I don´t know what this flag do. Its new since WotlK and if you have some idea post thme. I will add this then here.

  • 236 > apkgra02.m2
  • 362 > arhflo02.m2
  • 219 > atcgra02.m2
  • 699 > csclov01.m2

Now we must create a new doodad set.

>> Open the GroundEffectTexture.dbc
>> Insert a new line at the bottom with the next heigher ID.
>> Right click on an existing line
>> Select copy line to


>> Write the 4 doodad IDs in the cells 2 till 4 (yellow).
>> The next 4 values (green) define how often this doodad appear depending on the other values. The cell 6 is the value for doodad 1 and so on.
>> Next value in cell 10 is for the amount and the grouping of all dodads together. At the bottom of the tutorial you will find some Images that show some values for this cell.
>> Cell 11 (purple) is a link to the TerrainType.dbc.
>> Save the DBC to your patch folder.

Quote
This DBC defines the sound you make, visual effects you get if you walk on ground. Like particels of sand flow up and footsteps you make in snow and sand. Just have a look at cell 2 in this DBC. There you have some description like sand or grass. So you can just use existing entrys here that fit to your texture.

Assign your set to a texture


>> FIrst make a backup of your ADT where you want to set the effects.
>> Open your map folder and the tools/cmd folder in two windows and place them besides each other.
>> drag&drop your maptile on the groundeffectadder.exe.


The tool will ask you now what ID you want to set for every existing texture in the ADT.
Note that there can be more textures listed than you see on your adt. Just ignore the not used ones.

>> Enter -1 if you don´t want to change an entry.
>> Enter 0 if you want to delete the existing set.
>> Enter the ID if the texture occures that you want to add the ground effects set to.

You must repeat this step every time you add a texture to the ADT or swap one in noggit.

Build the groundeffects date


Now we must build/rebuild the groundeffects data in the maptile.

>> First again BACKUP the files you want to change!
>> Load the maptile with noggit and save it.

Quote
To save a maptile in noggit you need to change it. Moving a model a bit or use the blur tool with small radius is enough. This must be done because greachins water cmd tool write on the end of the ADT where it not belongs and Mjollnas tool get problems with this.

>> Open your map folder and the tools/cmd folder in two windows and place them beside each other.
>> Drag&drop your maptile on the ground_doodads_fixing.exe.

A black window will short open and you will see manny numbers flowting by.


The tool doesn´t overwrite the original file. It creates a new one that gets the string _new added at the end of the filename. Just delete the original and rename the _new file.

You must repeat this step every time you change textures in noggit.

Now you must create a MPQ that includes the ADT and the 2 groundeffects DBCs in the right folders.
Go ingame and have a look. If the models don´t fit you can just edit the DBC entrys and set other model IDs.
For this task there is no need to use one of the two cmd tools again.

It can take some time to get a good looking set that fits your environment.


Sample images for cell 10 value


The following images show you how the value in cell 10 effects the placement and grouping of the groundeffects.


0


1


2


4


8


16


24


48


128

75
Getting started the WoTtLK tutorial / 09 - Water Script in Depth
« on: December 08, 2012, 01:10:28 am »

Introducing


The problem with noggit in the current version is that it doesn't support new water included since 3.2.2 in the ADT files. There are 3 tools at the moment to handle water.

    * A comand line tool that just adds water on one level on one ADT.
    * A GUI tool where you can turn on and off water per chunk with different settings and height.
    * A tool to extract water and add it again later.

I only work with the first tool at the moment, but I will have a look at the others and expand this tutorial part later.

Quote
A comand line or CMD tool have no grafic interface. You can use it with the comannd line console by typing commands.
http://en.wikipedia.org/wiki/Command_Prompt

The CMD Tool AllWater_wotlk.exe


The tool is located at

E:WoWModdingToolsCMDAllWater_wotlk.exe

I use scripts where I add a command for every single ADT with needed parameters. This way you can just run the script and all ADTs have water back again. You used such a script already in part 04 of the tutorial.

So lets have a closer look at this script

>> Open the script in your favorite text editor like notepad or notepad + +

F:WoWModdingProjectsTutorialProjectscriptsWater-Test01.bat


Quote
If you later create your own script the ending extention is important. It must be .bat NOT .txt. If you click on a .bat file, windows will open it and run every line of text inside as a comand.

You see different lines in the following style.

Code: [Select]
"../../../tools/AllWater_wotlk.exe" ../patch/world/maps/test01/test01_31_31.adt 0 2 80
So what do these lines do?

The first part runs the AllWater_wotlk.exe over a relative path.
The 2 dotts ".." just tell the CMD to exit the folder you are currently in.

E:WoWModdingProjectsTutorialProjectscripts

So the first ".." exits scripts folder and the second the folder TutorialProject and the last the folder Projects.
So the CMD is now located in

E:WoWModding

Now we enter the tools subfolder where we find our AllWater_wotlk.exe

tools/AllWater_wotlk.exe

Next we give the tool 4 parameters that it should use.

    * ../patch/world/maps/test01/test01_31_31.adt
    * 0
    * 2
    * 80

The first one defines the ADT we want to edit again as a relative path. We exit scripts, enter patch/world/maps/test01 and use the ADT file test01_31_31.adt

The next parameter (0) define the height of the water surface. It´s just the Z value from noggit. 0 is used for ocean level most of the time.

The next parameter (2) is the type of the water. This manages the sound you hear and the look of the water inside the client . You can get this ID from the DBC liquid.dbc

The next value is the transparency of the water surface. As lower the value the more you can see the ground under the water surface.

At the first look all of this seems to be quite complicated but if you use the tutorial structure, you can just copy the line in the future and only have to change the path to the ADT and the settings to your needs and won't have to think about the rest.

Fix Errors


If you got an error you can start the script inside a CMD window to see possible errors.

>> Open up a commandline window by typing CMD into the windows search field inside the start menu and select cmd.exe
>> Type f: and return to change the drive you work on. You have to choose your drive here where the WoWModding folder is located.
>> Type CD WoWModdingProjectsTutorialProjectscripts and return. To get into the scripts folder
>> Type Water-Test01.bat and hit return
 
Now the script runs and you can see if it throws any error messages.

This guide has been completely proof-read and corrected in grammar by Mountainlion. Feel free to message him.


10 - Add a full new map from scratch

Pages: 1 ... 3 4 [5] 6 7 ... 12